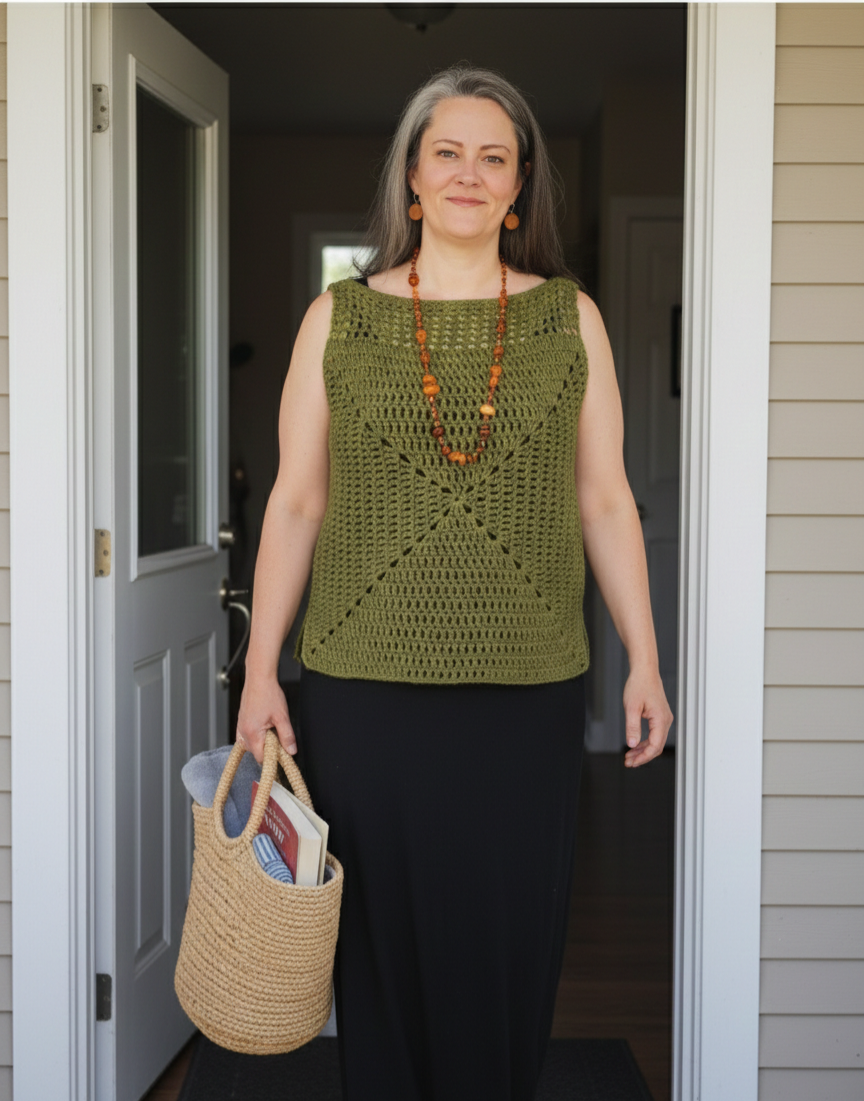
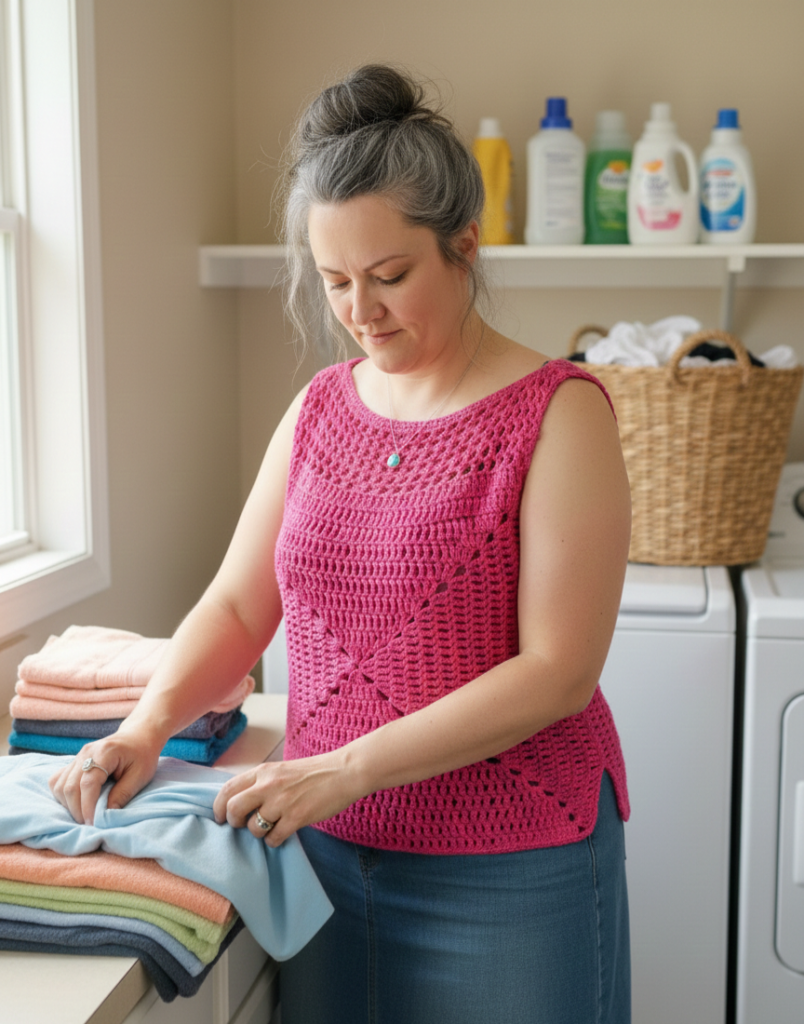
In my part of the world it’s wonderful to see things awaking from their winter slumber. A few tulips and daffodils are out in the yard along with some crocus. Tiny little green buds are on the trees. The birds are happily singing and the sun has been glorious! So it’s time to break out the crochet summer top patterns! The first is this Granny Square Tank Top.
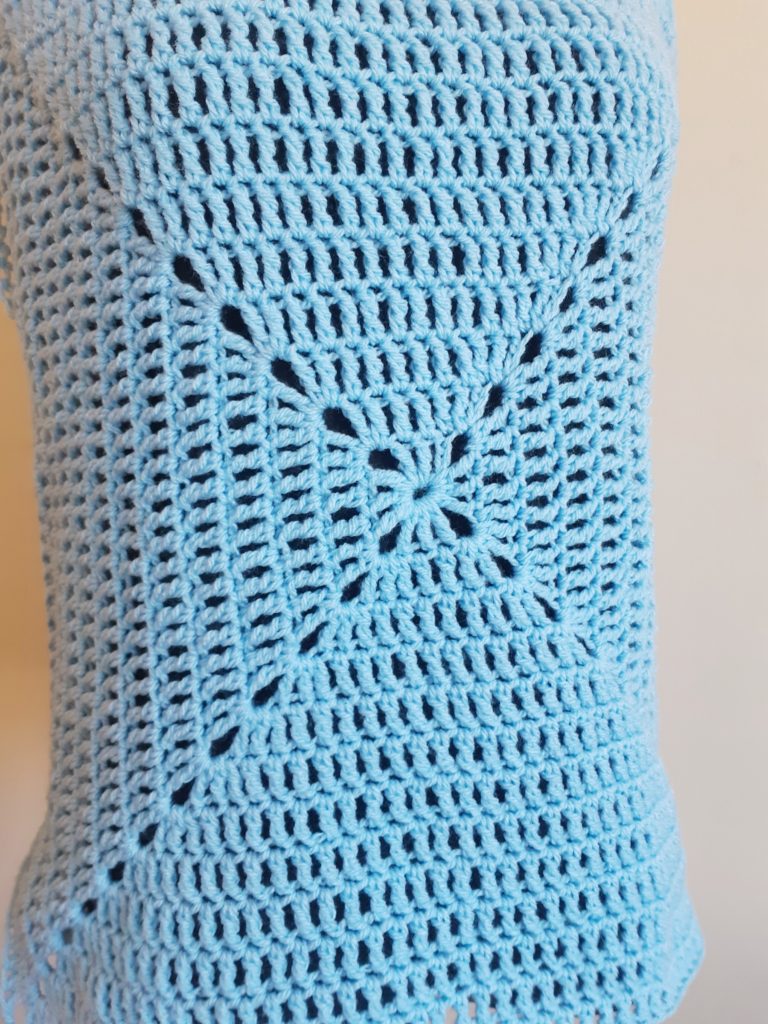
I designed this crochet summer tank top based on the solid granny square thinking it would be airy enough with a triple crochet stitch. The pattern is an easy one, using only a few stitches and lots of easy repetition and it works up really quickly. It’s a great quick project and really doesn’t use a lot of yarn so you could even use up some odds and ends if you wanted to do this in multiple colors.
I’m not a big fan of seams and a project like this doesn’t lend itself well to being worked in a spiral, so I have worked the seams in to the corners of the granny square instead of in the body of the project. What this means is that the first 3 stitches (including the chain 4 starting off the round) are worked in to the same chain stitch you slip stitch in to. It sounds a little complicated and I will eventually create a video for this, but in the meantime I am including a very rudimentary pictorial on how to do this to hide your seam in the corner for this crochet summer top.
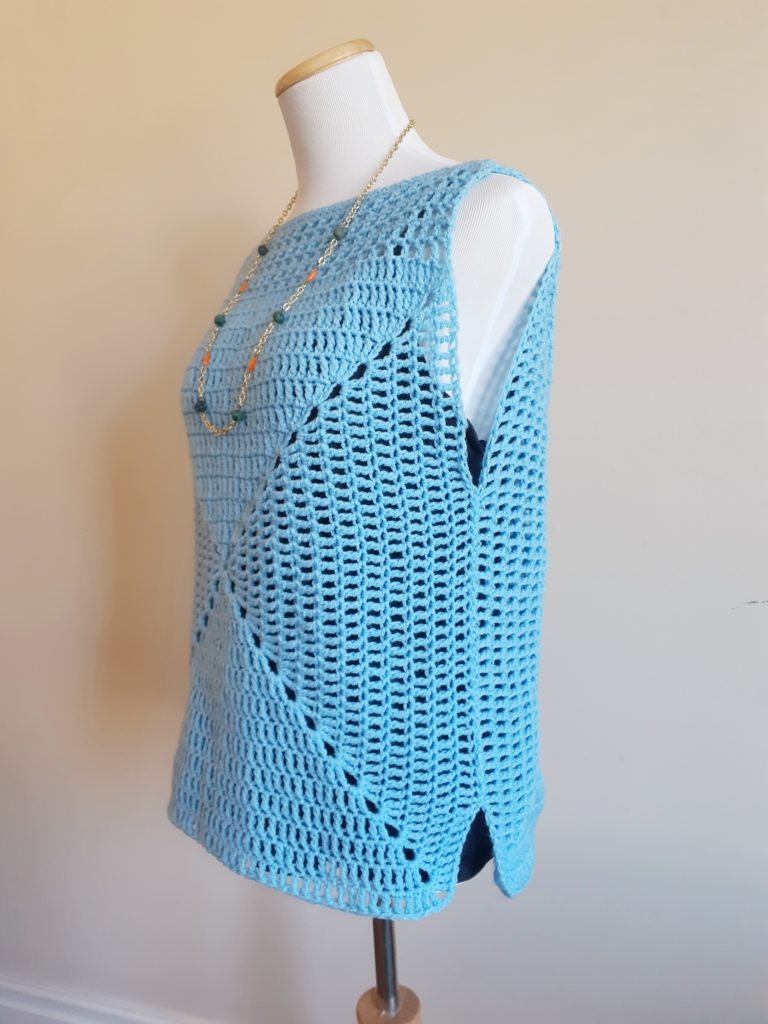
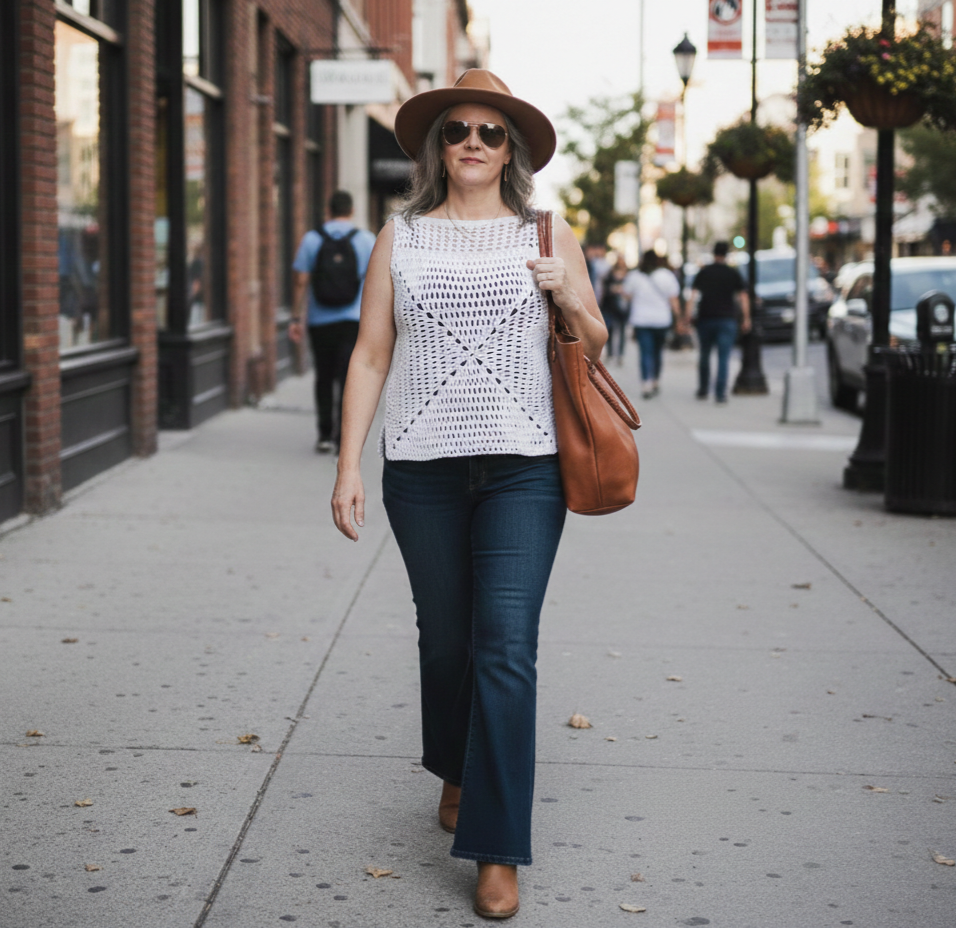
The great thing about the design of this crochet summer top is that it also lends itself really well to tweaks and changes. You can create more length by adding a few rows of TC to the bottom or you can add a few more mesh rows to the top. You could increase the width without increasing the length in the same way by adding a few rows on to either side of the front or back panel. I designed a big arm hole on this because I’d wear it with another tank top layer underneath, but you can easily adapt it and create a tighter arm hole.
Have some fun with this crochet summer top! Try it out in different colors and get out there and enjoy some sunshine!
For more summer wearables, take a look at the Mariposa Summer Sweater, the Carmine Top and the Mana Halter Top.
LET’S GET MAKING! Scroll down for the free pattern for this Crochet Summer Top OR you can get the Ad-Free, printable version from my Etsy store HERE
SUPPLY LIST – 5 mm hook, Any Category 3 acrylic yarn (used: Red Heart Comfort Sport in Light Blue), Approx 570 yards (525 metres) for the size L pictured, Scissors, Tapestry needle
STITCHES / ABBREVIATIONS – CH – chain, SL ST – slip stitch, SC – single crochet, SK ST – skip stitch, DC – double crochet, TC – triple crochet
SIZES – Small (S), Medium (M), Large (L), Extra Large (XL)
FINISHED MEASUREMENTS – S – 14.5” width (29” circumference), 17.5” height, M – 16” width (32” circumference), 19” height, L – 18.5” width (37” circumference), 21.5” height, XL – 20” width (40” circumference), 23” height
GAUGE – 5 ½ rows x 12 1/3 stitches = 4”x4”
DIFFICULTY LEVEL – Intermediate
PATTERN & SIZING NOTES –
– For this crochet summer top, the chain 4 at the beginning of every row counts as a stitch
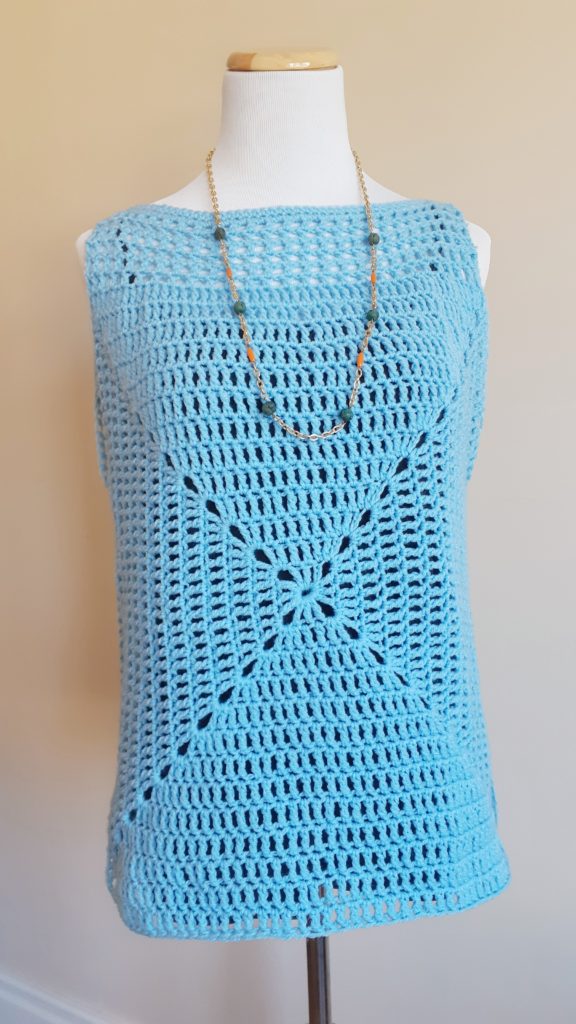
– This project is made creating 2 equal Granny Squares for the front and back, adding a mesh neckline and affixing them together
– Sizes have the following number of rounds for the granny squares: S=9, M=11, L=13, XL=15
– For extra length you can add mesh rows at the top neckline OR you can add rows of TC at the bottom
– This is a highly adaptable project, you can change the arm hole sizes, the neck hole size, the length and the width as needed
– This crochet summer top is creating hiding the seam for each row/round in the corner of the granny squares – if you are ok with a seam in a different location, by all means, use the technique you’re most comfortable with, but for this pattern I hide it in the corner so please see the notes below
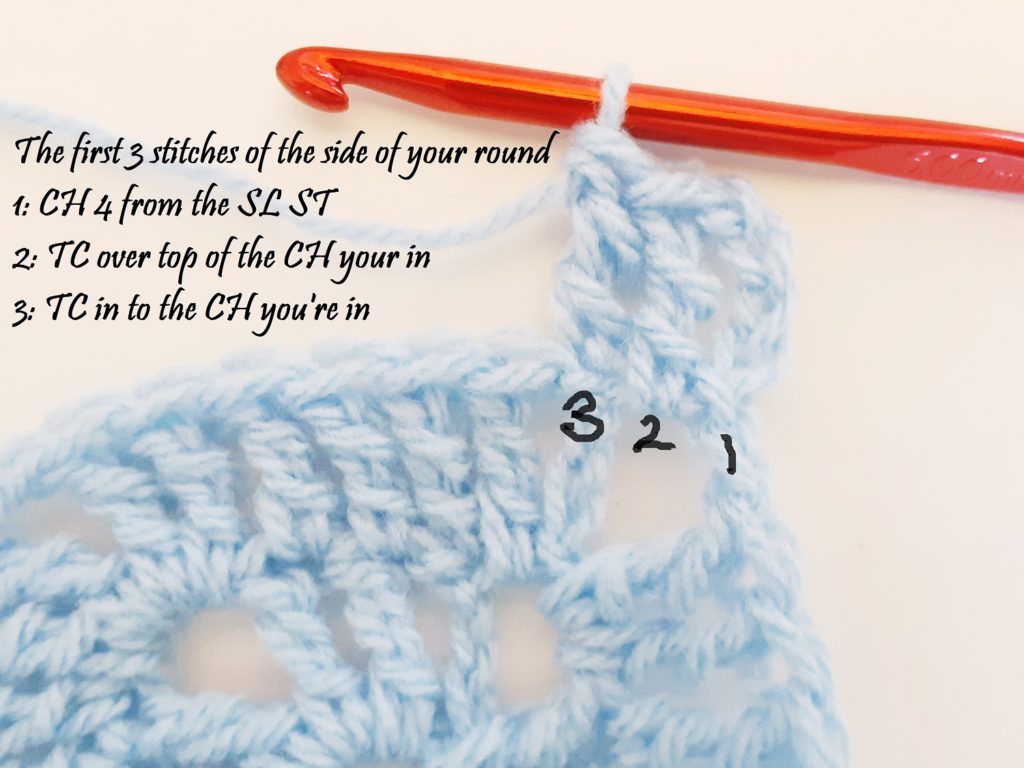
– For a visual instruction on how to start each round with the seam, please see instructions at the bottom of the pattern (3 STITCHES GO IN TO THE SAME CH STITCH YOU JOIN THE ROUND IN)
– The seam corner requires only a CH 1 space instead of a CH 2 space in the remaining 3 corners

IMPORTANT NOTES –
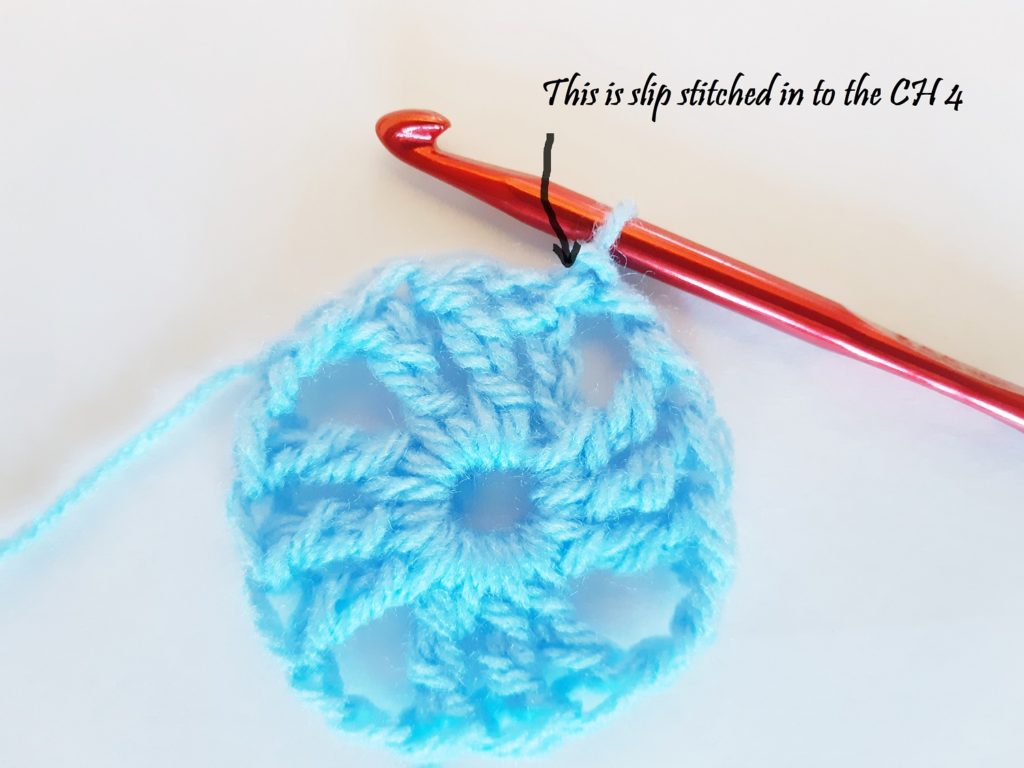
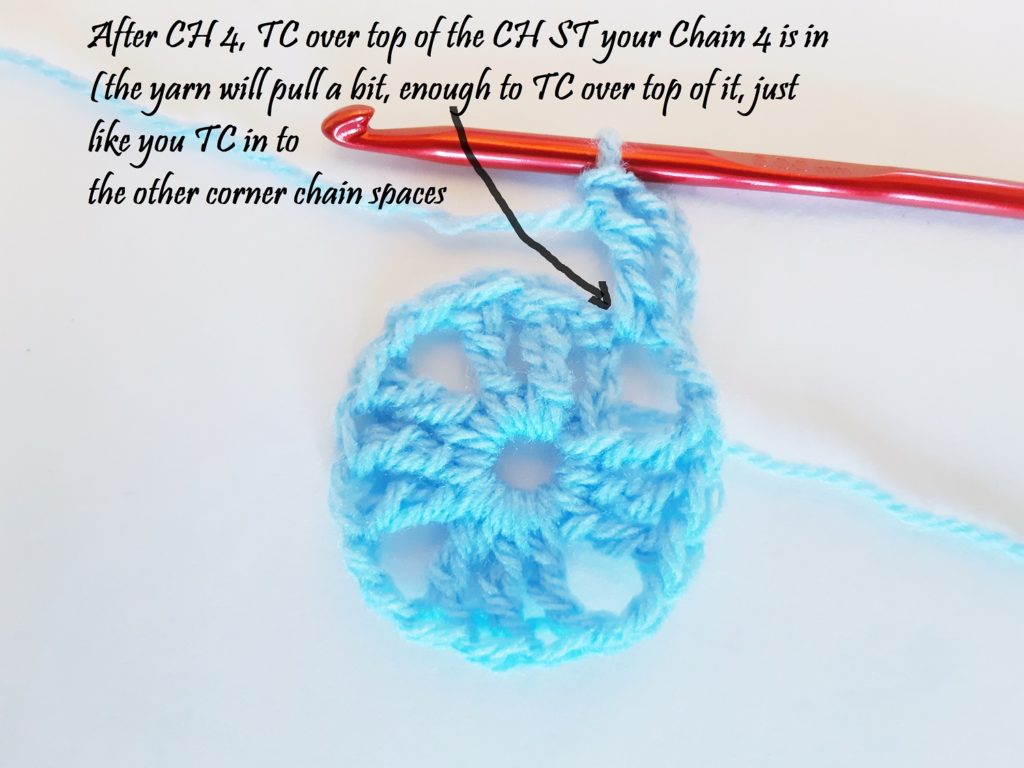
***IMPORTANT*** Please be aware that, since the seam is to be hidden
in the corner, when starting each round, you will CH 4 then TC over
top of the SL ST your CH 4 is in then TC again in to the middle of the
CH 4 you’re in — this is considered the hidden stitch of your
corner, see next poin
***IMPORTANT***
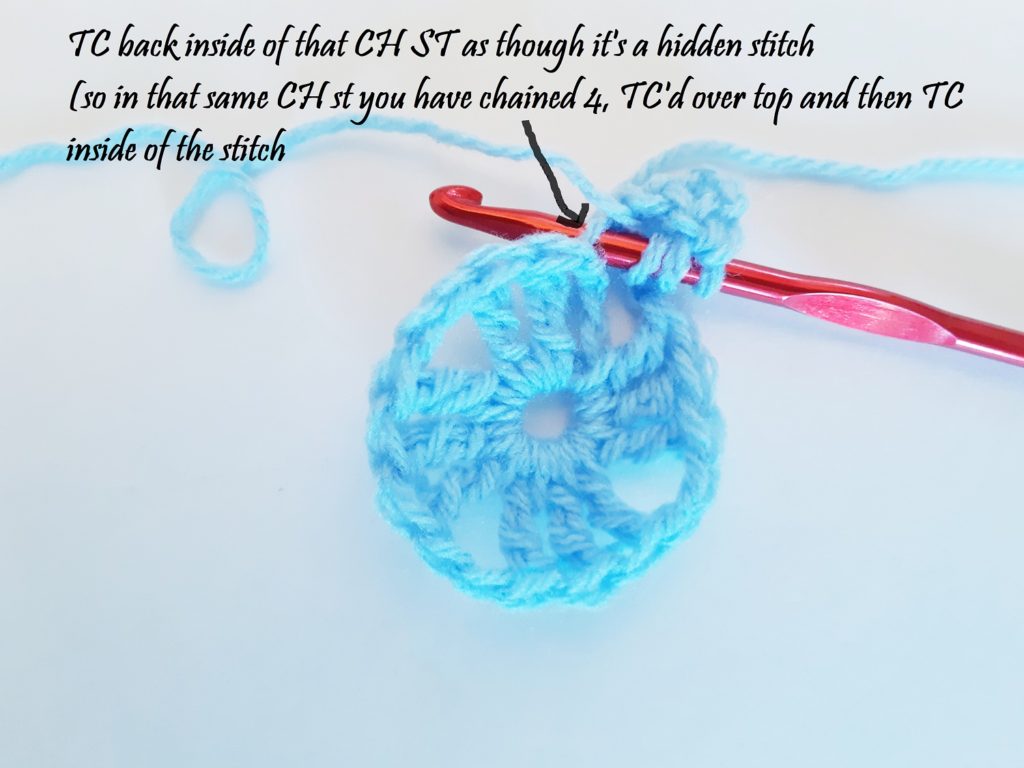
If you’re unfamiliar with these granny squares, please be aware that
you must crochet in to the ‘hidden stitch’ after turning each corner
of a round (for more information on the hidden stitch and finding the
hidden stitch, please see a post about the hidden corner stitch and
how to find it at http://www.lookatwhatimade.net/crafts/yarn/crochet/crochet-tutorials/crochet-corners-elusive-hidden-stitch/) The yardage is approximate based on the gauge of the pattern of a size Large
INSTRUCTIONS –
2 x EQUAL SIZED GRANNY SQUARES + MESH NECKLINE for the Crochet Summer Top
Make 2 x equally sized granny squares plus the mesh neckline for the front and back panels of the shirt.
GRANNY SQUARES:
CH 4 and SL ST to join
ROUND 1: 3 ST per side plus CH 2’s in 3 corners and CH 1 in last corner CH 4 (counts as a ST), TC 2 more in to the circle, CH 2, TC 3, CH 2, TC 3, CH 2, TC 3, CH 1 and SL ST in to 4th CH of starting CH
ROUND 2:
7 ST per side plus CH 2’s in 3 corners and CH 1 in last corner
CH
4, TC over the SL ST from the CH 4 in the previous row, TC in to the
middle of the CH 4 from the previous row ** for visual
instructions on this see below**
Side 1: TC in next 2 ST, TC 2 in CH space, CH 2, TC 2 more in to CH space
Side 2: TC in next 3 ST, TC 2 in CH space, CH 2, TC 2 more in to CH space
Side 3: TC in next 3 ST, TC 2 in CH space, CH 2, TC 2 more in to CH space
Side 4: TC in next 3 ST, TC 2 in CH space, CH 1, SL ST in to 4th CH of the first “stitch” of the round
ROUND 3:
11 ST per side plus CH 2’s in 3 corners and CH 1 in last corner
CH 4, TC over the SL ST from the CH 4 in the previous row, TC in to the middle of the CH 4 from the previous row
Side 1: TC in next 6 ST, TC 2 in CH space, CH 2, TC 2 more in to CH space
Side 2: TC in next 7 ST, TC 2 in CH space, CH 2, TC 2 more in to CH space
Side 3: TC in next 7 ST, TC 2 in CH space, CH 2, TC 2 more in to CH space
Side 4: TC in next 7 ST, TC 2 in CH space, CH 1, SL ST in to 4th CH of the first “stitch” of the round
ROUND 4:
15 ST per side plus CH 2’s in 3 corners and CH 1 in last corner
CH 4, TC over the SL ST from the CH 4 in the previous row, TC in to the middle of the CH 4 from the previous row
Side 1: TC in next 10 ST, TC 2 in CH space, CH 2, TC 2 more in to CH space
Side 2: TC in next 11 ST, TC 2 in CH space, CH 2, TC 2 more in to CH space
Side 3: TC in next 11 ST, TC 2 in CH space, CH 2, TC 2 more in to CH space
Side 4: TC in next 11 ST, TC 2 in CH space, CH 1, SL ST in to 4th CH of the first “stitch” of the round
ROUND 5:
19 ST per side plus CH 2’s in 3 corners and CH 1 in last corner
CH 4, TC over the SL ST from the CH 4 in the previous row, TC in to the middle of the CH 4 from the previous row
Side 1: TC in next 14 ST, TC 2 in CH space, CH 2, TC 2 more in to CH space
Side 2: TC in next 15 ST, TC 2 in CH space, CH 2, TC 2 more in to CH space
Side 3: TC in next 15 ST, TC 2 in CH space, CH 2, TC 2 more in to CH space
Side 4: TC in next 15 ST, TC 2 in CH space, CH 1, SL ST in to 4th CH of the first “stitch” of the round
ROUND 6:
23 ST per side plus CH 2’s in 3 corners and CH 1 in last corner
CH 4, TC over the SL ST from the CH 4 in the previous row, TC in to the middle of the CH 4 from the previous row
Side 1: TC in next 18 ST, TC 2 in CH space, CH 2, TC 2 more in to CH space
Side 2: TC in next 19 ST, TC 2 in CH space, CH 2, TC 2 more in to CH space
Side 3: TC in next 19 ST, TC 2 in CH space, CH 2, TC 2 more in to CH space
Side 4: TC in next 19 ST, TC 2 in CH space, CH 1, SL ST in to 4th CH of the first “stitch” of the round
ROUND 7:
27 ST per side plus CH 2’s in 3 corners and CH 1 in last corner
CH 4, TC over the SL ST from the CH 4 in the previous row, TC in to the middle of the CH 4 from the previous row
Side 1: TC in next 22 ST, TC 2 in CH space, CH 2, TC 2 more in to CH space
Side 2: TC in next 23 ST, TC 2 in CH space, CH 2, TC 2 more in to CH space
Side 3: TC in next 23 ST, TC 2 in CH space, CH 2, TC 2 more in to CH space
Side 4: TC in next 23 ST, TC 2 in CH space, CH 1, SL ST in to 4th CH of the first “stitch” of the round
ROUND 8:
31 ST per side plus CH 2’s in 3 corners and CH 1 in last corner
CH 4, TC over the SL ST from the CH 4 in the previous row, TC in to the middle of the CH 4 from the previous row
Side 1: TC in next 26 ST, TC 2 in CH space, CH 2, TC 2 more in to CH space
Side 2: TC in next 27 ST, TC 2 in CH space, CH 2, TC 2 more in to CH space
Side 3: TC in next 27 ST, TC 2 in CH space, CH 2, TC 2 more in to CH space
Side 4: TC in next 27 ST, TC 2 in CH space, CH 1, SL ST in to 4th CH of the first “stitch” of the round
ROUND 9: ***LAST ROUND FOR SIZE SMALL
35 ST per side plus CH 2’s in 3 corners and CH 1 in last corner
CH 4, TC over the SL ST from the CH 4 in the previous row, TC in to the middle of the CH 4 from the previous row
Side 1: TC in next 30 ST, TC 2 in CH space, CH 2, TC 2 more in to CH space
Side 2: TC in next 31 ST, TC 2 in CH space, CH 2, TC 2 more in to CH space
Side 3: TC in next 31 ST, TC 2 in CH space, CH 2, TC 2 more in to CH space
Side 4: TC in next 31 ST, TC 2 in CH space, CH 1, SL ST in to 4th CH of the first “stitch” of the round
ROUND 10:
39 ST per side plus CH 2’s in 3 corners and CH 1 in last corner
CH 4, TC over the SL ST from the CH 4 in the previous row, TC in to the middle of the CH 4 from the previous row
Side 1: TC in next 34 ST, TC 2 in CH space, CH 2, TC 2 more in to CH space
Side 2: TC in next 35 ST, TC 2 in CH space, CH 2, TC 2 more in to CH space
Side 3: TC in next 35 ST, TC 2 in CH space, CH 2, TC 2 more in to CH space
Side 4: TC in next 35 ST, TC 2 in CH space, CH 1, SL ST in to 4th CH of the first “stitch” of the round
ROUND 11: ***LAST ROUND FOR SIZE MEDIUM
43 ST per side plus CH 2’s in 3 corners and CH 1 in last corner
CH 4, TC over the SL ST from the CH 4 in the previous row, TC in to the middle of the CH 4 from the previous row
Side 1: TC in next 38 ST, TC 2 in CH space, CH 2, TC 2 more in to CH space
Side 2: TC in next 39 ST, TC 2 in CH space, CH 2, TC 2 more in to CH space
Side 3: TC in next 39 ST, TC 2 in CH space, CH 2, TC 2 more in to CH space
Side 4: TC in next 39 ST, TC 2 in CH space, CH 1, SL ST in to 4th CH of the first “stitch” of the round
ROUND 12:
47 ST per side plus CH 2’s in 3 corners and CH 1 in last corner
CH 4, TC over the SL ST from the CH 4 in the previous row, TC in to the middle of the CH 4 from the previous row
Side 1: TC in next 42 ST, TC 2 in CH space, CH 2, TC 2 more in to CH space
Side 2: TC in next 43 ST, TC 2 in CH space, CH 2, TC 2 more in to CH space
Side 3: TC in next 43 ST, TC 2 in CH space, CH 2, TC 2 more in to CH space
Side 4: TC in next 43 ST, TC 2 in CH space, CH 1, SL ST in to 4th CH of the first “stitch” of the round
ROUND 13: ***LAST ROUND FOR SIZE LARGE
51 ST per side plus CH 2’s in 3 corners and CH 1 in last corner CH 4, TC over the SL ST from the CH 4 in the previous row, TC in to the middle of the CH 4 from the previous row
Side 1: TC in next 46 ST, TC 2 in CH space, CH 2, TC 2 more in to CH space
Side 2: TC in next 47 ST, TC 2 in CH space, CH 2, TC 2 more in to CH space
Side 3: TC in next 47 ST, TC 2 in CH space, CH 2, TC 2 more in to CH space
Side 4: TC in next 47 ST, TC 2 in CH space, CH 1, SL ST in to 4th CH of the first “stitch” of the round
ROUND 14:
55 ST per side plus CH 2’s in 3 corners and CH 1 in last corner
CH 4, TC over the SL ST from the CH 4 in the previous row, TC in to the middle of the CH 4 from the previous row
Side 1: TC in next 50 ST, TC 2 in CH space, CH 2, TC 2 more in to CH space
Side 2: TC in next 51 ST, TC 2 in CH space, CH 2, TC 2 more in to CH space
Side 3: TC in next 51 ST, TC 2 in CH space, CH 2, TC 2 more in to CH space
Side 4: TC in next 51 ST, TC 2 in CH space, CH 1, SL ST in to 4th CH of the first “stitch” of the round
ROUND 15: ***LAST ROUND FOR SIZE XL
59 ST per side plus CH 2’s in 3 corners and CH 1 in last corner
CH 4, TC over the SL ST from the CH 4 in the previous row, TC in to the middle of the CH 4 from the previous row
Side 1: TC in next 54 ST, TC 2 in CH space, CH 2, TC 2 more in to CH space
Side 2: TC in next 55 ST, TC 2 in CH space, CH 2, TC 2 more in to CH space
Side 3: TC in next 55 ST, TC 2 in CH space, CH 2, TC 2 more in to CH space
Side 4: TC in next 55 ST, TC 2 in CH space, CH 1, SL ST in to 4th CH of the first “stitch” of the round
MESH NECKLINE for the Crochet Summer Top:
The following is the ST count for the 4 sizes for the mesh rows of the neckline: S: 35 ST, M 43 ST, L 51 ST, XL 59 ST
ROW 1 to 6: CH 3, *SK ST and DC into next stitch*, repeat * to * until the end of the row
ROW 7 & 8: SC in each stitch across
Tie off
ASSEMBLY of the Crochet Summer Top:
– Put the 2 granny squares together facing right sides out – Thread an 18” piece of yarn on your tapestry needle
– Join at the tops of the shoulders for the first 6 ST in on each side using the mattress stitch, tie off and secure
– Join the sides of the shirt by marking the following stitches on each side (counted from only the granny square portion, not the mesh portion) Size S: mark stitches 11 to 27, Size M: mark stitches 13 to 35, Size L: mark stitches 15 to 43, Size LX: mark stitches 17 to 51
– Using the mattress stitch, join together the sides between (and including) those marked stitches
– Tie off and secure, weave in ends
Voila! A beautiful crochet summer tank you can wear year after year!