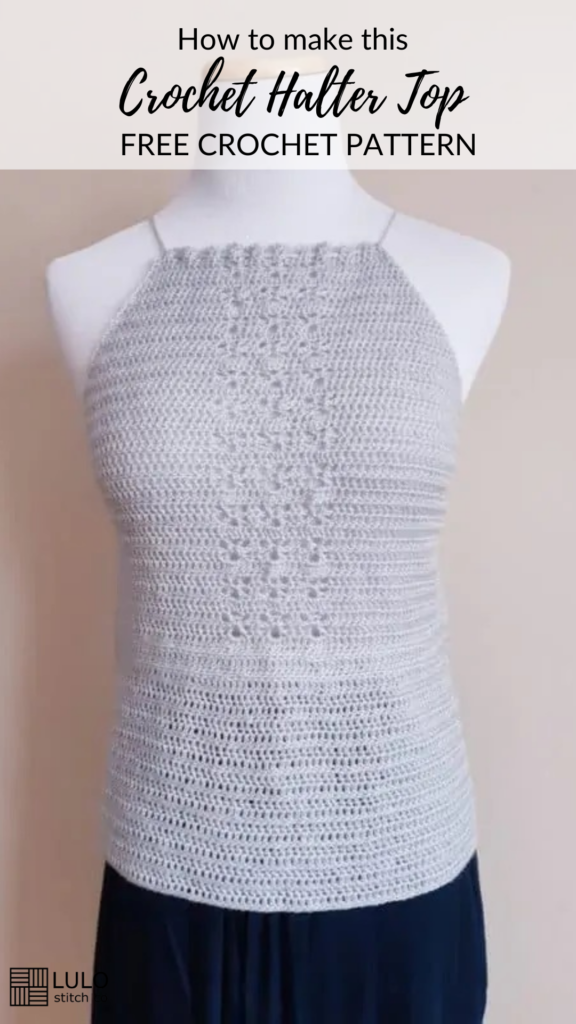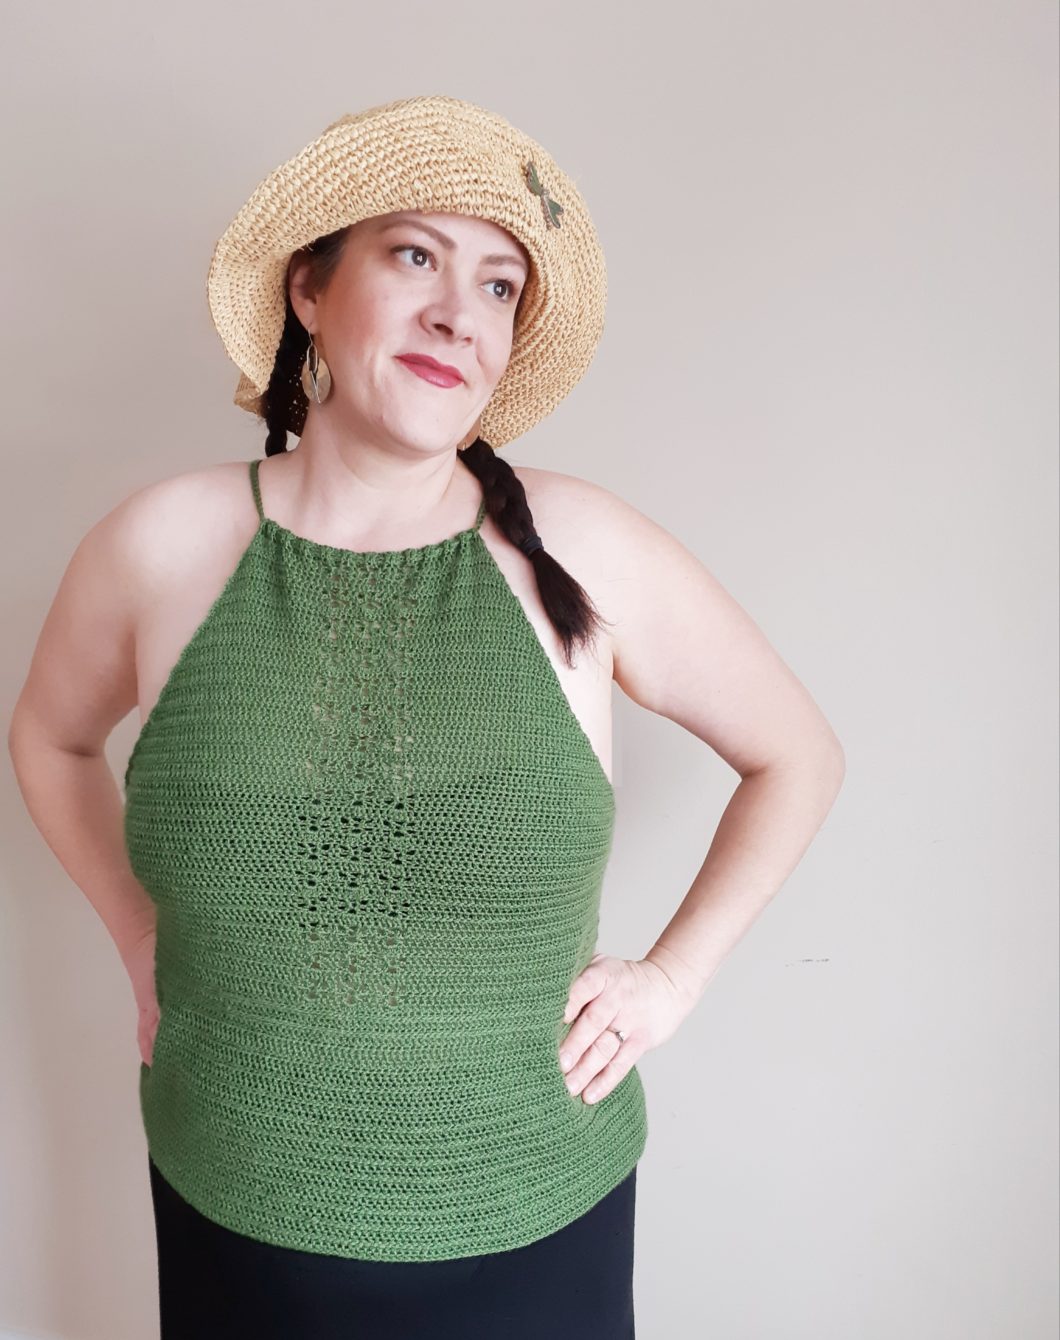
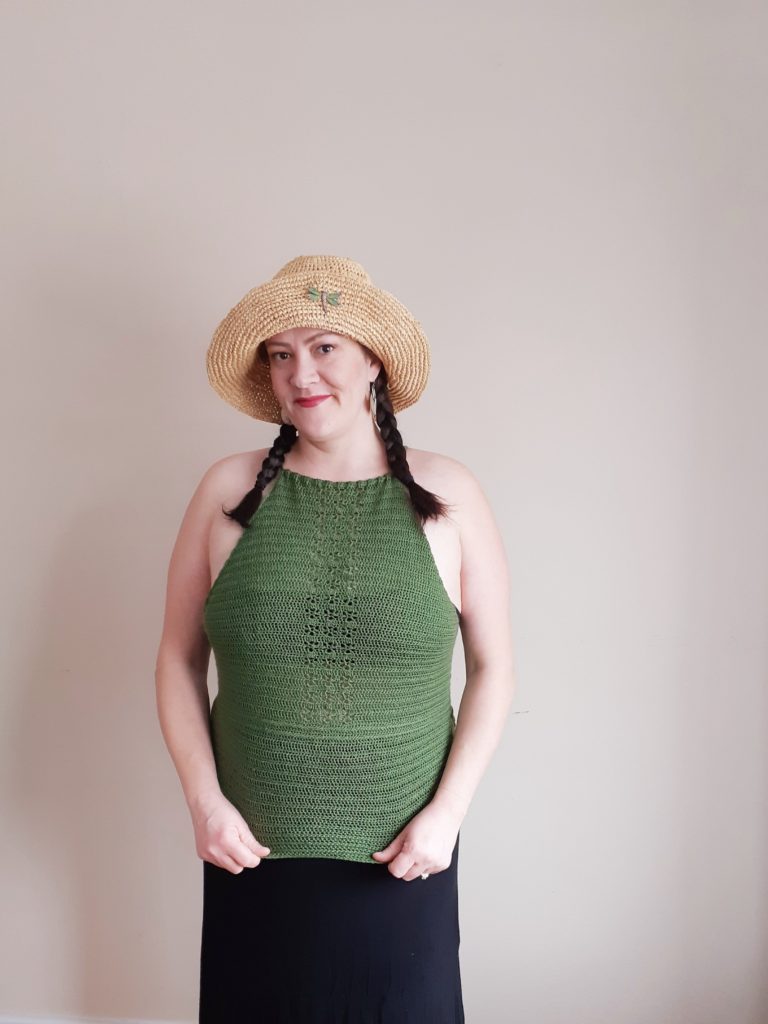
The Mana Halter Top
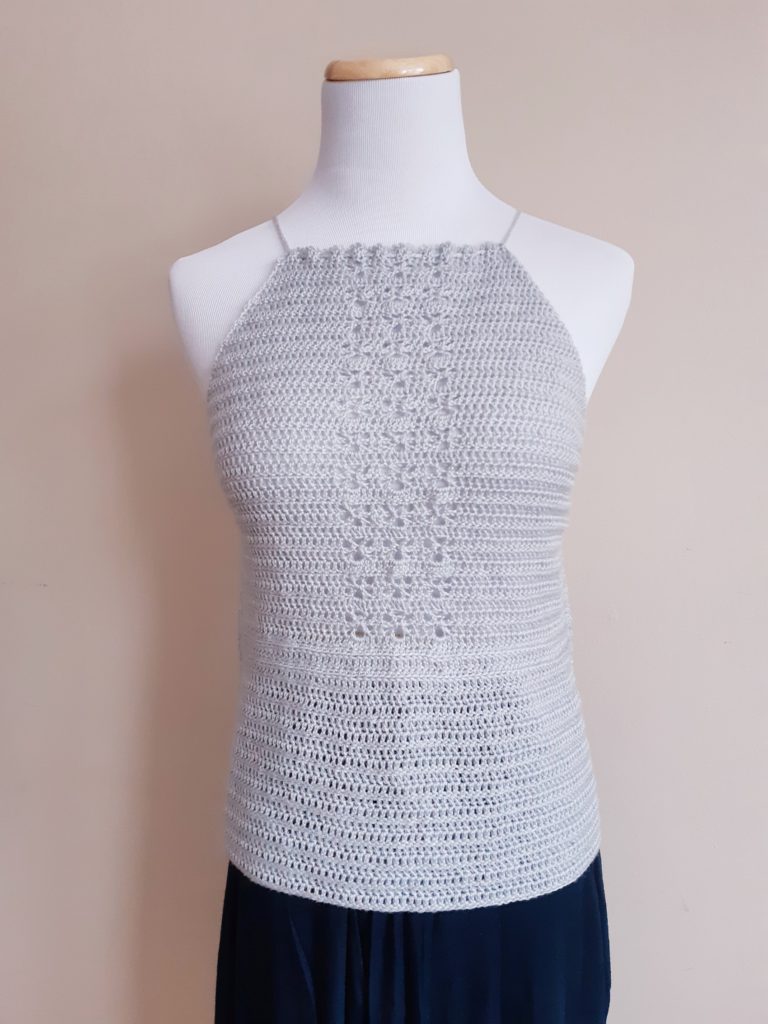
I wanted to start on some warmer weather wear and I think I hit the mark with this adorable crochet halter tank top. It was a lot of fun to dream up and create. It features a halter neck, a cute eyelet bodice on the front and has nice drape and stretch.
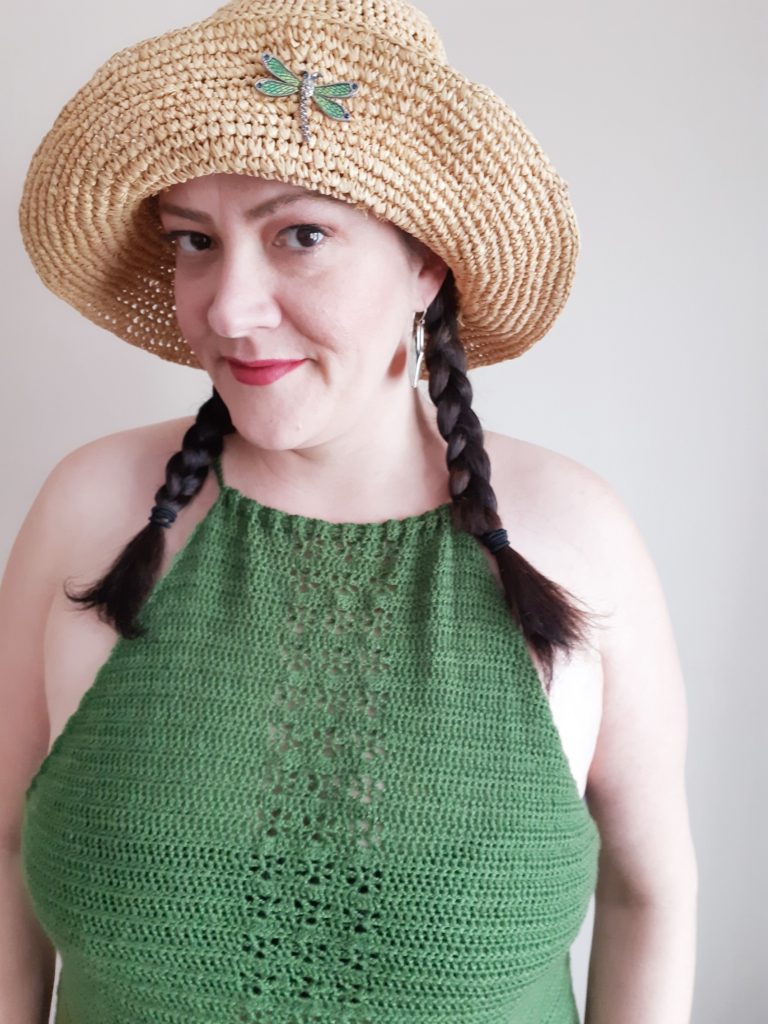
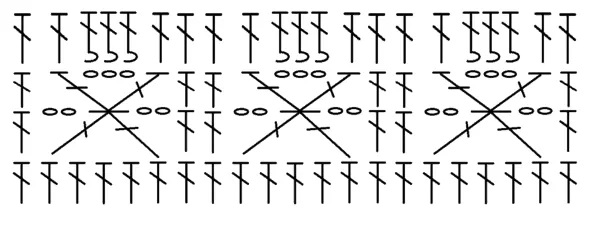
Don’t be scared off by the eyelets, they really are quite easy once you get the hang of it, and I’ve also included a chart for those who are more visual about a crochet stitch. The end result, however, is that you use some easy stitches to create a delicate eyelet on this cute crochet halter top with very little effort at all… and we could all use with expending a little less effort once in a while (wink).
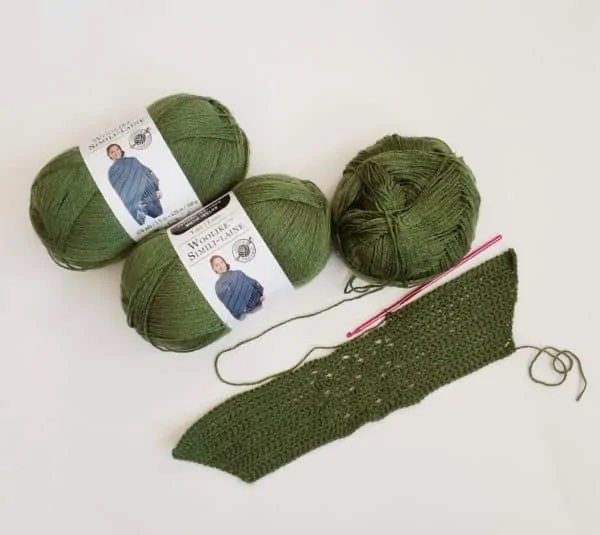
The yarn I used is a 1wt Super Fine yarn (Loops & Threads “Woolike”) and the majority of this crochet top is double crochet, making it a good project for beginners who like a challenge (with the eyelets in particular) or an intermediate crocheter.
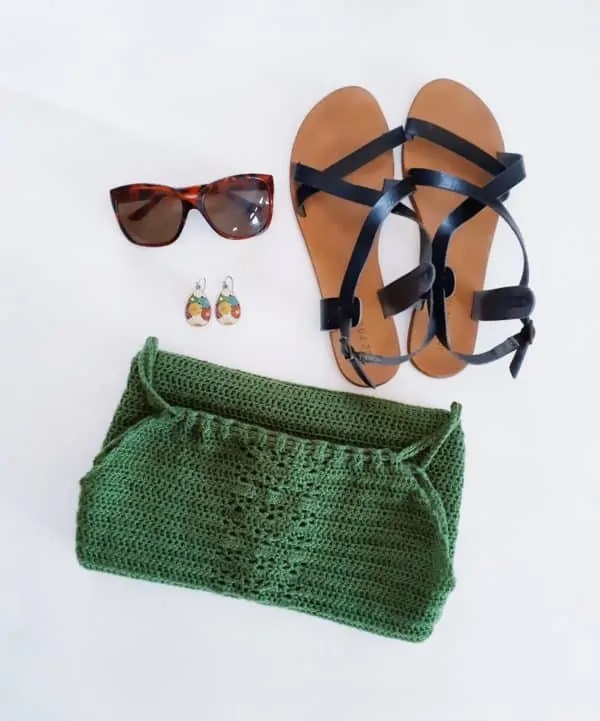
As you can see below, this crochet halter top works in any color – just look how elegant and chic it looks in the grey below. This top is very customizable. If you’re partial to a shorter or cropped halter, you can subtract rows and end it just before or after the ribbed waist. If you want to turn it in to a dress, just add a LOT more rows. You could use ribbon for the neck tie or simply crochet straps edge to edge over the shoulders instead of using a tie that’s woven through like I have done here.
If you like this top and want to check out a few more lightweight summer tops, please take a look at my Carmine Mesh Top or my Granny Square Tank Top.
This lightweight boho-inspired crochet top was originally a guest post on Joy of Motion‘s blog and I’m happy offer the free pattern here as well now!
LET’S GET MAKING! Scroll down for the FREE pattern for this charming crochet halter top OR you can PURCHASE the Ad-Free, printable PDF from my Etsy store HERE.
| SUPPLY LIST |
| 3.5mm hook Any Category 1 super fine yarn (Yarn Used: Loops & Threads “Woolike” in Olive and Grey) Approx yardage: Size Small – 800 yards // 730 m, Size Medium – 950 yards // 868 m, Size Large – 1100 yards // 1005 m, Size XL – 1200 yards // 1097 m Scissors Tapestry needle |
| STITCHES / ABBREVIATIONS |
| CH – chain ST – stitch SL ST – slip stitch SC – single crochet HDC – half double crochet DC – double crochet DC2togSK3 – double crochet 2 together with 3 skipped stitches in between (in the case of this pattern, this happens in the eyelets only and is indicated in the chart below) DC3L – double crochet in the 3rd loop |
| SIZES |
| Small, Medium, Large, Extra Large |
| FINISHED MEASUREMENTS |
| The chest measurements are given for the resting project, but this top has a lot of stretch to it and there are 2” – 3” of positive give in each size Small – 17” width (for 34” chest), 18.5” length Medium – 18.5” width (for 37” chest), 18.5” length Large – 20.5” width (for 41” chest), 21” length XL – 22.5” width (for 45” chest), 21” length |
| GAUGE |
| 21 ST x 13 rows = 4” x 4” |
| DIFFICULTY LEVEL |
| Intermediate |
| PATTERN AND SIZING NOTES |
| – At the end of each row, the stitch count is given in parenthesis. – This halter top is made using a 1st yarn and a 3.5mm hook but adjust, if desired, to achieve the gauge since not all yarns are created equal and cottons and synthetics behave differently while being worked. – The Turning Chains count as a stitch for all rows except rows 1 & 2 for all sizes. – The chains in the eyelets count as a stitch. There are no decreases in this project and since the turning chains count as a stitch, you will need to work in to them or with them in the count. – All the increases are made placing one additional stitch at the beginning and one additional stitch at the end of the row. Therefore, in rows where there IS an increase, you work a stitch in to the 1st stitch after the turning chain and 2 stitches in to the last stitch (which is the turning chain from the row below)… and in rows where there is NOT an increase, you skip the 1st stitch from the chain and work your first stitch in the 2nd stitch from your turning chain – and in the last row only work 1 stitch in to the last stitch (which is the turning chain). Keep count of your stitches in order to make sure you’re on track. – The eyelet sequences are in parentheses in the pattern [ ] – The eyelets are in a set of 3 with 2 DC’s separating each and are comprised of 19 stitches, not including the stitches on either side of the set (see eyelet chart below) The eyelets require 3 rows to complete (the bottom row is for reference and the DC’s on the each side of the sequence are also for reference, but the entire sequence is 19 stitches wide) – *** The “hook” on the sets of 3 stitches in the top row of the pictured chart indicate that the DC should go AROUND the chain 3 and not IN to the chain stitches. |
INSTRUCTIONS:
THE INSTRUCTIONS FOR THE MAIN PORTIONS OF ALL 4 SIZES ARE SEPARATED FOR EASIER FOLLOWING AND THE INSTRUCTIONS FOR THE NECK TIE AND ASSEMBLY FOR ALL SIZES ARE AT THE END
SIZE SMALL – CROCHET HALTER TOP :
SMALL FRONT PANEL:
Reminder: Turning Chains count as a stitch from ROW 3 onward (rows 1 & 2 have no increases but rows 3 to 26 are all increases), so increases must go in to the first stitch at the beginning of a row, and 2 stitches in to the turning chain at the end of the row
Foundation Chain: CH 43 + 1 to turn
Row 1: SC in each CH across, CH 3 and turn (43)
Row 2: DC in each stitch across, CH 3 and turn (43)
Row 3:
DC 13 (incl 1st ST increase)
[CH 2, DC2togSK3, CH 2], DC 2
Repeat [ to ], DC 2
Repeat [ to ], DC 13 (incl last ST increase), CH 3 and turn (45)
Row 4:
DC 14 (incl 1st ST increase)
[DC in to 3rd ST (the 2tog), CH 3, DC in to that same ST], DC 2
Repeat [ to ], DC 2
Repeat [ to ], DC 14 (incl last ST increase), CH 3 and turn (47)
Row 5:
DC 15 (incl 1st ST increase)
[DC 1, DC 3 around the CH 3 below, DC 1], DC 2
Repeat [ to ], DC 2
Repeat [ to ], DC 15 (incl last ST increase), CH 3 and turn (49)
Rows 6 to 26:
Repeat rows 3, 4 & 5, remembering to increase by 2 stitches per row so that your stitch counts per row are as follows:
Row 6 (51), Row 7 (53), Row 8 (55), Row 9 (57), Row 10 (59), Row 11 (61), Row 12 (63), Row 13 (65), Row 14 (67), Row 15 (69), Row 16 (71), Row 17 (73), Row 18 (75), Row 19 (77), Row 20 (79), Row 21 (81), Row 22 (83), Row 23 (85), Row 24 (87), Row 25 (89), Row 26 (91)
NOTE: Increases stop here
Reminder: Since increases stop here and since our turning chains count as a stitch, from here onward you will skip the first stitch from your turning chain at the beginning of a row and will place only 1 stitch in turning chain at the end of your row.
Row 27:
DC 40 (SK 1st ST after CH)
[CH 2, DC2togSK3, CH 2], DC 2
Repeat [ to ], DC 2
Repeat [ to ], DC 40 (1 in turning CH) CH 3 and turn (91)
Row 28:
DC 40 (SK 1st ST after CH)
[DC in to 3rd ST (the 2tog), CH 3, DC in to that same ST], DC 2
Repeat [ to ], DC 2
Repeat [ to ], DC 40 (1 in turning CH), CH 3 and turn (91)
Row 29:
DC 40 (SK 1st ST after CH)
[DC 1, DC 3 around the CH 3 below, DC 1], DC 2
Repeat [ to ], DC 2
Repeat [ to ], DC 40 (1 in turning CH), CH 3 and turn (91)
Rows 30 to 38:
Repeat rows 27, 28, 29 remembering there are no increases so that your stitch count stays at 91 stitches per row between rows 27 and 38. (**except at the end of Row 38, CH 2 instead of 3 as we’re about to do a row of HDC)
Row 39: HDC in each ST across the row, CH 3 and turn (91)
Row 40: DC3L in each ST across the row, CH 2 and turn (91)
Row 41: HDC in each ST across the row, CH 3 and turn (91)
Row 42: DC3L in each ST across the row, CH 3 and turn (91)
Row 43 to 60:
DC in each ST across the row (SK 1st ST from CH, 1 ST in turning CH at end of row), CH 3 and turn (**at the end of row 60, CH 1 instead of 3 as we’re about to do a row of SC) (91)
Row 61: SC in each ST across the row (91)
TIE OFF and weave in ends
SMALL BACK PANEL:
Reminder: Turning Chains count as a stitch from ROW 3 onward (rows 1 & 2 have no increases but rows 3 to 26 are all increases), so increases must go in to the first stitch at the beginning of a row, and 2 stitches in to the turning chain at the end of the row
Foundation Chain: CH 43 + 1 to turn
Row 1: SC in each CH across, CH 3 and turn (43)
Row 2: DC in each stitch across, CH 3 and turn (43)
Rows 3 to 26:
Repeat row 2, remembering to start increasing by 2 stitches per row so that your stitch counts per row are as follows:
Row 6 (51), Row 7 (53), Row 8 (55), Row 9 (57), Row 10 (59), Row 11 (61), Row 12 (63), Row 13 (65), Row 14 (67), Row 15 (69), Row 16 (71), Row 17 (73), Row 18 (75), Row 19 (77), Row 20 (79), Row 21 (81), Row 22 (83), Row 23 (85), Row 24 (87), Row 25 (89), Row 26 (91)
NOTE: Increases stop here
Reminder: Since increases stop here and since our turning chains count as a stitch, from here onward you will skip the first stitch from your turning chain at the beginning of a row and will place only 1 stitch in turning chain at the end of your row.
Rows 27 to 38:
DC in each ST across the row (SK 1st ST from CH), CH 3 (**except at the end of row 38 CH 2 instead of 3 as we’re about to do a row of HDC) (99)
Row 39: HDC in each ST across the row, CH 3 and turn (91)
Row 40: DC3L in each ST across the row, CH 2 and turn (91)
Row 41: HDC in each ST across the row, CH 3 and turn (91)
Row 42: DC3L in each ST across the row, CH 3 and turn (91)
Row 43 to 60:
DC in each ST across the row (SK 1st ST from CH, 1 ST in turning CH at end of row), CH 3 and turn (**at the end of row 60, CH 1 instead of 3 as we’re about to do a row of SC) (91)
Row 61:
SC in each ST across the row (91)
TIE OFF and weave in ends
SIZE MEDIUM – CROCHET HALTER TOP:
MEDIUM FRONT PANEL:
Reminder: Turning Chains count as a stitch from ROW 3 onward (rows 1 & 2 have no increases but rows 3 to 30 are all increases), so increases must go in to the first stitch at the beginning of a row, and 2 stitches in to the turning chain at the end of the row
Foundation Chain: CH 43 + 1 to turn
Row 1: SC in each CH across, CH 3 and turn (43)
Row 2: DC in each stitch across, CH 3 and turn (43)
Row 3:
DC 13 (incl 1st ST increase)
[CH 2, DC2togSK3, CH 2], DC 2
Repeat [ to ], DC 2
Repeat [ to ], DC 13 (incl last ST increase), CH 3 and turn (45)
Row 4:
DC 14 (incl 1st ST increase)
[DC in to 3rd ST (the 2tog), CH 3, DC in to that same ST], DC 2
Repeat [ to ], DC 2
Repeat [ to ], DC 14 (incl last ST increase), CH 3 and turn (47)
Row 5:
DC 15 (incl 1st ST increase)
[DC 1, DC 3 around the CH 3 below, DC 1], DC 2
Repeat [ to ], DC 2
Repeat [ to ], DC 15 (incl last ST increase), CH 3 and turn (49)
Rows 6 to 30:
Repeat rows 3, 4 & 5, remembering to increase by 2 stitches per row so that your stitch counts per row are as follows:
Row 6 (51), Row 7 (53), Row 8 (55), Row 9 (57), Row 10 (59), Row 11 (61), Row 12 (63), Row 13 (65), Row 14 (67), Row 15 (69), Row 16 (71), Row 17 (73), Row 18 (75), Row 19 (77), Row 20 (79), Row 21 (81), Row 22 (83), Row 23 (85), Row 24 (87), Row 25 (89), Row 26 (91), Row 27 (93), Row 28 (95), Row 29 (97) Row 30 (99)
NOTE: Increases stop here
Reminder: Since increases stop here and since our turning chains count as a stitch, from here onward you will skip the first stitch from your turning chain at the beginning of a row and will place only 1 stitch in turning chain at the end of your row.
Row 31:
DC 40 (SK 1st ST after CH)
[CH 2, DC2togSK3, CH 2], DC 2
Repeat [ to ], DC 2
Repeat [ to ], DC 40 (1 in turning CH) CH 3 and turn (99)
Row 32:
DC 40 (SK 1st ST after CH)
[DC in to 3rd ST (the 2tog), CH 3, DC in to that same ST], DC 2
Repeat [ to ], DC 2
Repeat [ to ], DC 40 (1 in turning CH), CH 3 and turn (99)
Row 33:
DC 40 (SK 1st ST after CH)
[DC 1, DC 3 around the CH 3 below, DC 1], DC 2
Repeat [ to ], DC 2
Repeat [ to ], DC 40 (1 in turning CH), CH 3 and turn (99)
Rows 34 to 38:
Repeat rows 31, 32, 33 remembering there are no increases so that your stitch count stays at 99 stitches per row between rows 31 and 38. (**except at the end of Row 38, CH 2 instead of 3 as we’re about to do a row of HDC)
Row 39: HDC in each ST across the row, CH 3 and turn (99)
Row 40: DC3L in each ST across the row, CH 2 and turn (99)
Row 41: HDC in each ST across the row, CH 3 and turn (99)
Row 42: DC3L in each ST across the row, CH 3 and turn (99)
Row 43 to 60:
DC in each ST across the row (SK 1st ST from CH, 1 ST in turning CH at end of row), CH 3 and turn (**at the end of row 60, CH 1 instead of 3 as we’re about to do a row of SC) (99)
Row 61: SC in each ST across the row (99)
TIE OFF and weave in ends
MEDIUM BACK PANEL:
Reminder: Turning Chains count as a stitch from ROW 3 onward (rows 1 & 2 have no increases but rows 3 to 30 are all increases), so increases must go in to the first stitch at the beginning of a row, and 2 stitches in to the turning chain at the end of the row
Foundation Chain: CH 43 + 1 to turn
Row 1: SC in each CH across, CH 3 and turn (43)
Row 2: DC in each stitch across, CH 3 and turn (43)
Rows 3 to 30:
Repeat row 2, remembering to start increasing by 2 stitches per row so that your stitch counts per row are as follows:
Row 6 (51), Row 7 (53), Row 8 (55), Row 9 (57), Row 10 (59), Row 11 (61), Row 12 (63), Row 13 (65), Row 14 (67), Row 15 (69), Row 16 (71), Row 17 (73), Row 18 (75), Row 19 (77), Row 20 (79), Row 21 (81), Row 22 (83), Row 23 (85), Row 24 (87), Row 25 (89), Row 26 (91), Row 27 (93), Row 28 (95), Row 29 (97) Row 30 (99)
NOTE: Increases stop here
Reminder: Since increases stop here and since our turning chains count as a stitch, from here onward you will skip the first stitch from your turning chain at the beginning of a row and will place only 1 stitch in turning chain at the end of your row.
Rows 31 to 68:
DC in each ST across the row (SK 1st ST from CH), CH 3 (**except at the end of row 38 CH 2 instead of 3 as we’re about to do a row of HDC) (99)
Row 39: HDC in each ST across the row, CH 3 and turn (99)
Row 40: DC3L in each ST across the row, CH 2 and turn (99)
Row 41: HDC in each ST across the row, CH 3 and turn (99)
Row 42: DC3L in each ST across the row, CH 3 and turn (99)
Row 43 to 60:
DC in each ST across the row (SK 1st ST from CH, 1 ST in turning CH at end of row), CH 3 and turn (**at the end of row 60, CH 1 instead of 3 as we’re about to do a row of SC) (99)
Row 61:
SC in each ST across the row (99)
TIE OFF and weave in ends
SIZE LARGE – CROCHET HALTER TOP:
LARGE FRONT PANEL:
Reminder: Turning Chains count as a stitch from ROW 3 onward (rows 1 & 2 have no increases but rows 3 to 30 are all increases), so increases must go in to the first stitch at the beginning of a row, and 2 stitches in to the turning chain at the end of the row
Foundation Chain: CH 53 + 1 to turn
Row 1: SC in each CH across, CH 3 and turn (53)
Row 2: DC in each stitch across, CH 3 and turn (53)
Row 3:
DC 18 (incl 1st ST increase)
[CH 2, DC2togSK3, CH 2], DC 2
Repeat [ to ], DC 2
Repeat [ to ], DC 18 (incl last ST increase), CH 3 and turn (55)
Row 4:
DC 19 (incl 1st ST increase)
[DC in to 3rd ST (the 2tog), CH 3, DC in to that same ST], DC 2
Repeat [ to ], DC 2
Repeat [ to ], DC 19 (incl last ST increase), CH 3 and turn (57)
Row 5:
DC 20 (incl 1st ST increase)
[DC 1, DC 3 around the CH 3 below, DC 1], DC 2
Repeat [ to ], DC 2
Repeat [ to ], DC 20 (incl last ST increase), CH 3 and turn (59)
Rows 6 to 30:
Repeat rows 3, 4 & 5, remembering to increase by 2 stitches per row so that your stitch counts per row are as follows:
Row 6 (61), Row 7 (63), Row 8 (65), Row 9 (67), Row 10 (69), Row 11 (71), Row 12 (73), Row 13 (75), Row 14 (77), Row 15 (79), Row 16 (81), Row 17 (83), Row 18 (85), Row 19 (87), Row 20 (89), Row 21 (91), Row 22 (93), Row 23 (95), Row 24 (97), Row 25 (99), Row 26 (101), Row 27 (103), Row 28 (105), Row 29 (107) Row 30 (109)
NOTE: Increases stop here
Reminder: Since increases stop here and since our turning chains count as a stitch, from here onward you will skip the first stitch from your turning chain at the beginning of a row and will place only 1 stitch in turning chain at the end of your row.
Row 31:
DC 45 (SK 1st ST after CH)
[CH 2, DC2togSK3, CH 2], DC 2
Repeat [ to ], DC 2
Repeat [ to ], DC 45 (1 in turning CH) CH 3 and turn (109)
Row 32:
DC 45 (SK 1st ST after CH)
[DC in to 3rd ST (the 2tog), CH 3, DC in to that same ST], DC 2
Repeat [ to ], DC 2
Repeat [ to ], DC 45 (1 in turning CH), CH 3 and turn (109)
Row 33:
DC 45 (SK 1st ST after CH)
[DC 1, DC 3 around the CH 3 below, DC 1], DC 2
Repeat [ to ], DC 2
Repeat [ to ], DC 45 (1 in turning CH), CH 3 and turn (109)
Rows 34 to 50:
Repeat rows 31, 32, 33 remembering there are no increases so that your stitch count stays at 109 stitches per row between rows 34 and 50. (**except at the end of Row 50, CH 2 instead of 3 as we’re about to do a row of HDC)
Row 51: HDC in each ST across the row, CH 3 and turn (109)
Row 52: DC3L in each ST across the row, CH 2 and turn (109)
Row 53: HDC in each ST across the row, CH 3 and turn (109)
Row 54: DC3L in each ST across the row, CH 3 and turn (109)
Row 55 to 78:
DC in each ST across the row (SK 1st ST from CH, 1 ST in turning CH at end of row), CH 3 and turn (**at the end of row 78, CH 1 instead of 3 as we’re about to do a row of SC) (109)
Row 79: SC in each ST across the row (109)
TIE OFF and weave in ends
LARGE BACK PANEL:
Reminder: Turning Chains count as a stitch from ROW 3 onward (rows 1 & 2 have no increases but rows 3 to 30 are all increases), so increases must go in to the first stitch at the beginning of a row, and 2 stitches in to the turning chain at the end of the row
Foundation Chain: CH 53 + 1 to turn
Row 1: SC in each CH across, CH 3 and turn (53)
Row 2: DC in each stitch across, CH 3 and turn (53)
Rows 3 to 30:
Repeat row 2, remembering to start increasing by 2 stitches per row so that your stitch counts per row are as follows:
Row 6 (61), Row 7 (63), Row 8 (65), Row 9 (67), Row 10 (69), Row 11 (71), Row 12 (73), Row 13 (75), Row 14 (77), Row 15 (79), Row 16 (81), Row 17 (83), Row 18 (85), Row 19 (87), Row 20 (89), Row 21 (91), Row 22 (93), Row 23 (95), Row 24 (97), Row 25 (99), Row 26 (101), Row 27 (103), Row 28 (105), Row 29 (107) Row 30 (109)
NOTE: Increases stop here
Reminder: Since increases stop here and since our turning chains count as a stitch, from here onward you will skip the first stitch from your turning chain at the beginning of a row and will place only 1 stitch in turning chain at the end of your row.
Rows 31 to 50:
DC in each ST across the row (SK 1st ST from CH), CH 3 (**except at the end of row 50 CH 2 instead of 3 as we’re about to do a row of HDC) (109)
Row 51: HDC in each ST across the row, CH 3 and turn (109)
Row 52: DC3L in each ST across the row, CH 2 and turn (109)
Row 53: HDC in each ST across the row, CH 3 and turn (109)
Row 54: DC3L in each ST across the row, CH 3 and turn (109)
Row 55 to 78:
DC in each ST across the row (SK 1st ST from CH, 1 ST in turning CH at end of row), CH 3 and turn (**at the end of row 78, CH 1 instead of 3 as we’re about to do a row of SC) (109)
Row 79:
SC in each ST across the row (109)
TIE OFF and weave in ends
SIZE XL – CROCHET HALTER TOP:
XL FRONT PANEL:
Reminder: Turning Chains count as a stitch from ROW 3 onward (rows 1 & 2 have no increases but rows 3 to 35 are all increases), so increases must go in to the first stitch at the beginning of a row, and 2 stitches in to the turning chain at the end of the row
Foundation Chain: CH 53 + 1 to turn
Row 1: SC in each CH across, CH 3 and turn (53)
Row 2: DC in each stitch across, CH 3 and turn (53)
Row 3:
DC 18 (incl 1st ST increase)
[CH 2, DC2togSK3, CH 2], DC 2
Repeat [ to ], DC 2
Repeat [ to ], DC 18 (incl last ST increase), CH 3 and turn (55)
Row 4:
DC 19 (incl 1st ST increase)
[DC in to 3rd ST (the 2tog), CH 3, DC in to that same ST], DC 2
Repeat [ to ], DC 2
Repeat [ to ], DC 19 (incl last ST increase), CH 3 and turn (57)
Row 5:
DC 20 (incl 1st ST increase)
[DC 1, DC 3 around the CH 3 below, DC 1], DC 2
Repeat [ to ], DC 2
Repeat [ to ], DC 20 (incl last ST increase), CH 3 and turn (59)
Rows 6 to 35:
Repeat rows 3, 4 & 5, remembering to increase by 2 stitches per row so that your stitch counts per row are as follows:
Row 6 (61), Row 7 (63), Row 8 (65), Row 9 (67), Row 10 (69), Row 11 (71), Row 12 (73), Row 13 (75), Row 14 (77), Row 15 (79), Row 16 (81), Row 17 (83), Row 18 (85), Row 19 (87), Row 20 (89), Row 21 (91), Row 22 (93), Row 23 (95), Row 24 (97), Row 25 (99), Row 26 (101), Row 27 (103), Row 28 (105), Row 29 (107) Row 30 (109), Row 31 (111), Row 32 (113), Row 33 (115), Row 34 (117), Row 35 (119)
NOTE: Increases stop here
Reminder: Since increases stop here and since our turning chains count as a stitch, from here onward you will skip the first stitch from your turning chain at the beginning of a row and will place only 1 stitch in turning chain at the end of your row.
Row 36:
DC 45 (SK 1st ST after CH)
[CH 2, DC2togSK3, CH 2], DC 2
Repeat [ to ], DC 2
Repeat [ to ], DC 45 (1 in turning CH) CH 3 and turn (119)
Row 37:
DC 45 (SK 1st ST after CH)
[DC in to 3rd ST (the 2tog), CH 3, DC in to that same ST], DC 2
Repeat [ to ], DC 2
Repeat [ to ], DC 45 (1 in turning CH), CH 3 and turn (119)
Row 38:
DC 45 (SK 1st ST after CH)
[DC 1, DC 3 around the CH 3 below, DC 1], DC 2
Repeat [ to ], DC 2
Repeat [ to ], DC 45 (1 in turning CH), CH 3 and turn (119)
Rows 39 to 50:
Repeat rows 36, 37, 38 remembering there are no increases so that your stitch count stays at 119 stitches per row between rows 39 and 50. (**except at the end of Row 50, CH 2 instead of 3 as we’re about to do a row of HDC)
Row 51: HDC in each ST across the row, CH 3 and turn (119)
Row 52: DC3L in each ST across the row, CH 2 and turn (119)
Row 53: HDC in each ST across the row, CH 3 and turn (119)
Row 54: DC3L in each ST across the row, CH 3 and turn (119)
Row 55 to 78:
DC in each ST across the row (SK 1st ST from CH, 1 ST in turning CH at end of row), CH 3 and turn (**at the end of row 78, CH 1 instead of 3 as we’re about to do a row of SC) (119)
Row 79: SC in each ST across the row (119)
TIE OFF and weave in ends
XL BACK PANEL:
Reminder: Turning Chains count as a stitch from ROW 3 onward (rows 1 & 2 have no increases but rows 3 to 35 are all increases), so increases must go in to the first stitch at the beginning of a row, and 2 stitches in to the turning chain at the end of the row
Foundation Chain: CH 53 + 1 to turn
Row 1: SC in each CH across, CH 3 and turn (53)
Row 2: DC in each stitch across, CH 3 and turn (53)
Rows 3 to 35:
Repeat row 2, remembering to start increasing by 2 stitches per row so that your stitch counts per row are as follows:
Row 6 (61), Row 7 (63), Row 8 (65), Row 9 (67), Row 10 (69), Row 11 (71), Row 12 (73), Row 13 (75), Row 14 (77), Row 15 (79), Row 16 (81), Row 17 (83), Row 18 (85), Row 19 (87), Row 20 (89), Row 21 (91), Row 22 (93), Row 23 (95), Row 24 (97), Row 25 (99), Row 26 (101), Row 27 (103), Row 28 (105), Row 29 (107) Row 30 (109), Row 31 (111), Row 32 (113), Row 33 (115), Row 34 (117), Row 35 (119)
NOTE: Increases stop here
Reminder: Since increases stop here and since our turning chains count as a stitch, from here onward you will skip the first stitch from your turning chain at the beginning of a row and will place only 1 stitch in turning chain at the end of your row.
Rows 36 to 50:
DC in each ST across the row (SK 1st ST from CH), CH 3 (**except at the end of row 50 CH 2 instead of 3 as we’re about to do a row of HDC) (119)
Row 51: HDC in each ST across the row, CH 3 and turn (119)
Row 52: DC3L in each ST across the row, CH 2 and turn (119)
Row 53: HDC in each ST across the row, CH 3 and turn (119)
Row 54: DC3L in each ST across the row, CH 3 and turn (119)
Row 55 to 78:
DC in each ST across the row (SK 1st ST from CH, 1 ST in turning CH at end of row), CH 3 and turn (**at the end of row 78, CH 1 instead of 3 as we’re about to do a row of SC) (119)
Row 79:
SC in each ST across the row (119)
TIE OFF and weave in ends
NECK TIE FOR ALL SIZES:
Foundation Chain: Chain 200 + 1 to turn
SC 199 down the chain
SC 6 ST in the last CH to turn around the corner
SC199 down the back side of the chain
SC 5 in the last CH and SL ST in to the first ST of the row
TIE OFF and weave in ends
ASSEMBLY FOR ALL SIZES:
– Place your front panel and back panel together with the wrong sides out, right sides facing each other.
– Mark the following rows down from the top for each size S, M, L, XL (27, 31, 31, 36) which is where the increases stopped – this is where you will start seaming your sides
– Whip stitch (or any joining of your choice) your sides together between the appropriate row (from the line above) and the bottom. Remember that DC generally require 2 ‘stitches’ per row so you will have 2 x as many whip stitches as rows – this is not an exact science, however, and with such small yarn and small stitches, you don’t have to be precise about it, just try to place your whip stitches about 1-2mm apart all the way down. Also try to whip stitch through only 1 strand of yarn instead of through a whole DC post. Do this on both sides.
– Tie off and weave in ends.
– Weave the neck tie through the 1st row of DC just before the eyelets start at the top – I chose to weave around every 2 posts knowing it would leave an odd stitch count on one side (since it’s an odd stitch count across the row) but I don’t notice it at all since the stitches are so small. You could also just weave in and out of every stitch if you like – play with it and see what your preference is.
– When weaving the tie in the back, I had them meet in the middle and simply tied a bow in the middle of the back panel, but you could also tie it off to one side over your shoulder, OR make 2 ties to tie on either side if desired.