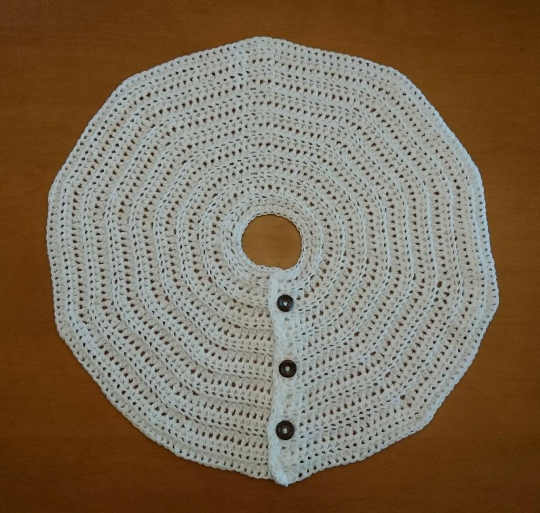
Today’s Pattern is the pretty farmhouse decor inspired “Snow Drift” Crochet Tree Skirt.
Let’s do some math!
As of the time I’m writing this post, it’s 73 days until Christmas Day. It sounds like a lot. That’s a good long stretch of time. We all know, however, that most people put the tree up well in advance of Christmas so they can enjoy a little extra atmosphere and cheer – as much as they can get.
So let’s say lots of people put their tree up in about 50 days from now. 50 days is only a month and a half. A month and a half from now, you’ll just be finishing up all the gifts you’re making in between all the other things that keep us busy in life leading up to the holidays like the shopping and the living. It doesn’t leave much time to make yourself this adorable crochet tree skirt.
That’s why I’m introducing this crochet tree skirt pattern now, at the tail end of our Canadian Thanksgiving Weekend and before Halloween is even here! You need a little time to get it done before the busiest time of the year creeps up, especially if you decide to make the larger size, as there are 2 SIZES AVAILABLE in my pattern for a 32″ diameter skirt and a 45″ diameter skirt.
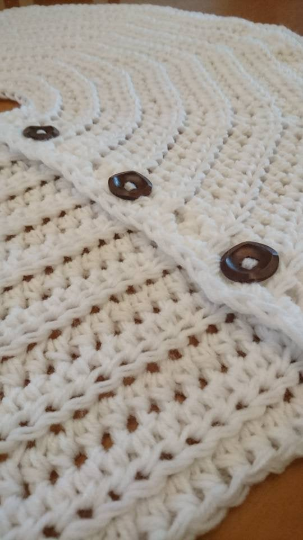
Of course I always love using 2 strands of yarn together to give the project that chunky look. I also love the farmhouse rustic style and was trying to accomplish that here. The wood buttons add a little extra rustic to it and the ribbing mimics snow drifts under a beautiful tree.
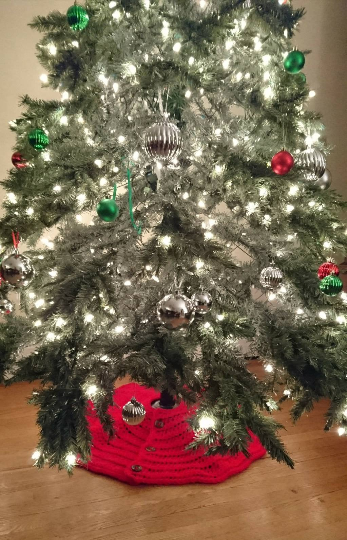
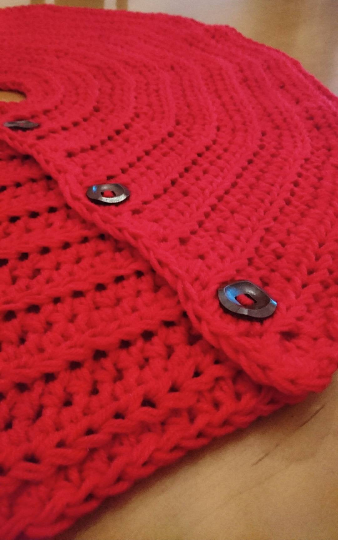
This crochet tree skirt pattern has actually been in my arsenal for a while and so for myself, I have both a white one and a red one, but this could also look wonderful in any other holiday color or a combination of them. Maybe even candy cane stripes! I won’t even think of saying Happy Holidays yet, but it sure won’t be long before we start hearing it…
If you’re looking for more Farmhouse-inspired crochet, take a look at the Farmhouse Basket, the Large Crochet Spa Basket, Luna Throw Blanket.
LET’S GET MAKING! Scroll down for the free pattern below OR you can get the Ad-Free, printable version from my Etsy store HERE
SUPPLY LIST – 10mm hook, Any Category 4 WW yarn, Yarn Used: Red Heart Comfort in White and in Red, Approx yardage: 850 yards/777 metres for 32” size; 1600 yards/1460 metres for 45” size, Scissors, 3 buttons for 32” size and 4 buttons for 45” size, Tapestry needle
STITCHES & ABBREVIATIONS – ST – stitch, SL ST – slip stitch, CH – chain, SC – single crochet, HDC – half double crochet, HDC BLO – half double crochet in back loop only
SIZES – Small & Large
FINISHED MEASUREMENTS – Small is 32” diameter and Large is 45” diameter
GAUGE – N/A
DIFFICULTY LEVEL – Beginner
PATTERN & SIZING NOTES –
– This tree skirt is created using a category 4wt yarn (Red Heart Comfort) but any category 4wt yarn will do
– This tree skirt is made using 2 strands of yarn held together to create a chunky, bulky look
– Chain 2’s at the beginning of each row do NOT count as a stitch – To wash/care instructions: This is an acrylic tree skirt, so the suggestion is to wash on gentle setting, then shape and lay flat to dry
INSTRUCTIONS –
32” DIAMETER SKIRT:
Using 2 strands of yarn held together, CH 30 + 2, turn
ROW 1: <2 HDC in 1st ST, 2 HDC> then repeat < > for the round, CH 2 & turn (40)
ROW 2: <2 HDC BLO in 1st ST, 3 HDC BLO> then repeat < > for the round, CH 2 & turn (50)
ROW 3: <2 HDC BLO in 1st ST, 4 HDC BLO> then repeat < > for the round, CH 2 & turn (60)
ROW 4: <2 HDC BLO in 1st ST, 5 HDC BLO> then repeat < > for the round, CH 2 & turn (70)
ROW 5: <2 HDC BLO in 1st ST, 6 HDC BLO> then repeat < > for the round, CH 2 & turn (80)
ROW 6: <2 HDC BLO in 1st ST, 7 HDC BLO> then repeat < > for the round, CH 2 & turn (90)
ROW 7: <2 HDC BLO in 1st ST, 8 HDC BLO> then repeat < > for the round, CH 2 & turn (100)
ROW 8: <2 HDC BLO in 1st ST, 9 HDC BLO> then repeat < > for the round, CH 2 & turn (110)
ROW 9: <2 HDC BLO in 1st ST, 10 HDC BLO> then repeat < > for the round, CH 2 & turn (120)
ROW 10: <2 HDC BLO in 1st ST, 11 HDC BLO> then repeat < > for the round, CH 2 & turn (130)
ROW 11: <2 HDC BLO in 1st ST, 12 HDC BLO> then repeat < > for the round, CH 2 & turn (140)
ROW 12: <2 HDC BLO in 1st ST, 13 HDC BLO> then repeat < > for the round, CH 2 & turn (150)
ROW 13: <2 HDC BLO in 1st ST, 14 HDC BLO> then repeat < > for the round, CH 2 & turn (160)
ROW 14: <2 HDC BLO in 1st ST, 15 HDC BLO> then repeat < > for the round, CH 2 & turn (170)
ROW 15: <2 HDC BLO in 1st ST, 16 HDC BLO> then repeat < > for the round, CH 2 & turn (180)
ROW 16: <2 HDC BLO in 1st ST, 17 HDC BLO> then repeat < > for the round, do not CH 2 (190)
FINISHING ROW:
– Add 2 more HDC in the last stitch of Row 16 to turn the corner
– We are now working up the side adding a row of SC to finish the inside of the first side, the center circle and back down the inside of the other side
– For HDC I generally add 3 stitches for every 2 rows, so you will be adding approximately 52 ‘finishing’ stitches
– Be sure to remember that all corner turns should have 3 stitches in them and in the last finishing stitch, only add 2 then SL ST to the 1st ST of the Row 16, yarn over and pull through to tie off and weave in ends.
– Add 3 buttons at equal/symmetric intervals, you needn’t worry about button holes as the stitch on this is loose enough you can just fasten the button through the work anywhere
45” DIAMETER SKIRT:
*** Complete all instructions up to the end of row 15 in the above instructions for the 32” skirt
ROW 16: <2 HDC BLO in 1st ST, 17 HDC BLO> then repeat < > for the round, CH 2 & turn (190)
ROW 17: <2 HDC BLO in 1st ST, 18 HDC BLO> then repeat < > for the round, CH 2 & turn (200)
ROW 18: <2 HDC BLO in 1st ST, 19 HDC BLO> then repeat < > for the round, CH 2 & turn (210)
ROW 19: <2 HDC BLO in 1st ST, 20 HDC BLO> then repeat < > for the round, CH 2 & turn (220)
ROW 20: <2 HDC BLO in 1st ST, 21 HDC BLO> then repeat < > for the round, CH 2 & turn (230)
ROW 21: <2 HDC BLO in 1st ST, 22 HDC BLO> then repeat < > for the round, CH 2 & turn (240)
ROW 22: <2 HDC BLO in 1st ST, 23 HDC BLO> then repeat < > for the round, CH 2 & turn (250)
ROW 23: <2 HDC BLO in 1st ST, 24 HDC BLO> then repeat < > for the round, CH 2 & turn (260)
ROW 24: <2 HDC BLO in 1st ST, 25 HDC BLO> then repeat < > for the round, CH 2 & turn (270)
ROW 25: <2 HDC BLO in 1st ST, 26 HDC BLO> then repeat < > for the round, CH 2 & turn (280)
ROW 26: <2 HDC BLO in 1st ST, 27 HDC BLO> then repeat < > for the round, CH 2 & turn (290)
ROW 27: <2 HDC BLO in 1st ST, 28 HDC BLO> then repeat < > for the round, CH 2 & turn (300)
ROW 28: <2 HDC BLO in 1st ST, 29 HDC BLO> then repeat < > for the round, do not CH 2 (310)
FINISHING ROW:
– Add 2 more HDC in the last stitch of Row 28 to turn the corner
– We are now working up the side adding a row of SC to finish the inside of the first side, the center circle and back down the inside of the other side
– For HDC I generally add 3 stitches for every 2 rows, so you will be adding approximately 88 ‘finishing’ stitches
– Be sure to remember that all corner turns should have 3 stitches in them and in the last finishing stitch, only add 2 then SL ST to the 1st ST of the Row 28, yarn over and pull through to tie off and weave in ends
– Add 4 buttons at equal/symmetric intervals, you needn’t worry about button holes as the stitch on this is loose enough you can just fasten the button through the work anywhere