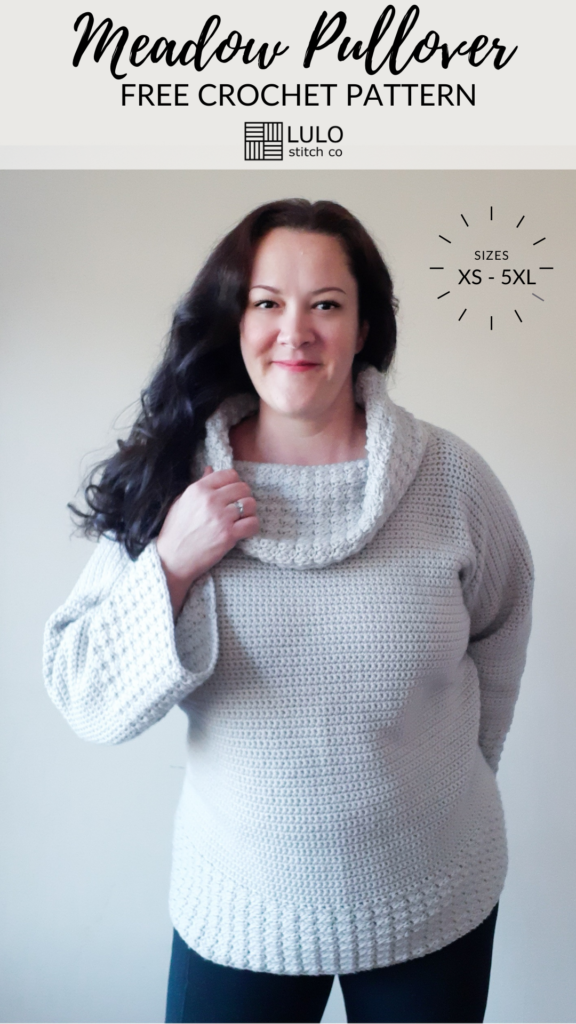
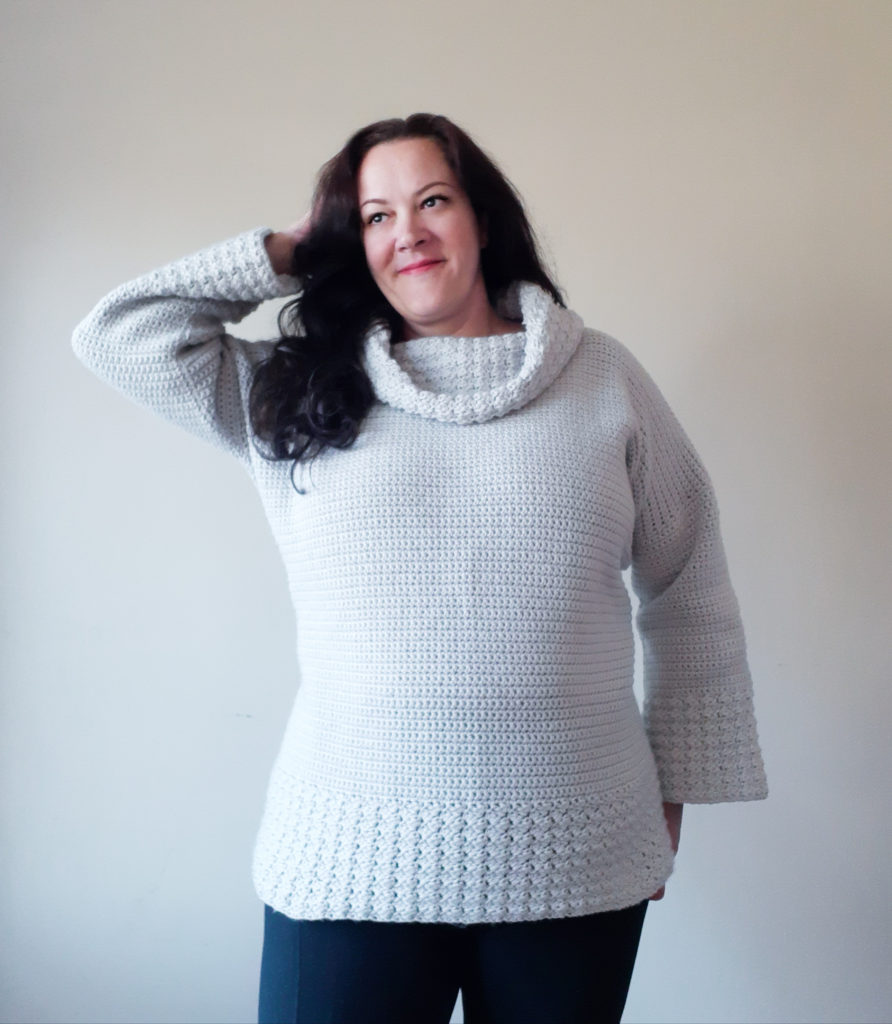
The Meadow Pullover
In my part of the world the weather is finally starting to feel winteresque. In fact, we are getting a snow storm today and I can’t think of a more perfect time to debut this incredibly cozy crochet cowl sweater, the Meadow Pullover, amidst silent, sparkly flurries.
I have been wanting to do a cowl sweater for some time, since I’ve done a few other styles like the Laurentian Cardi and the ever-classic Kensington Sweater Dress. I’ve been inspired lately by projects I’ve seen that use textured stitches for hems, cuffs and necklines besides the usual ribbed stitches. I wanted a stitch with some rich but subtle texture, nothing that would be too bumpy. The Sedge Stitch jumped out immediately.
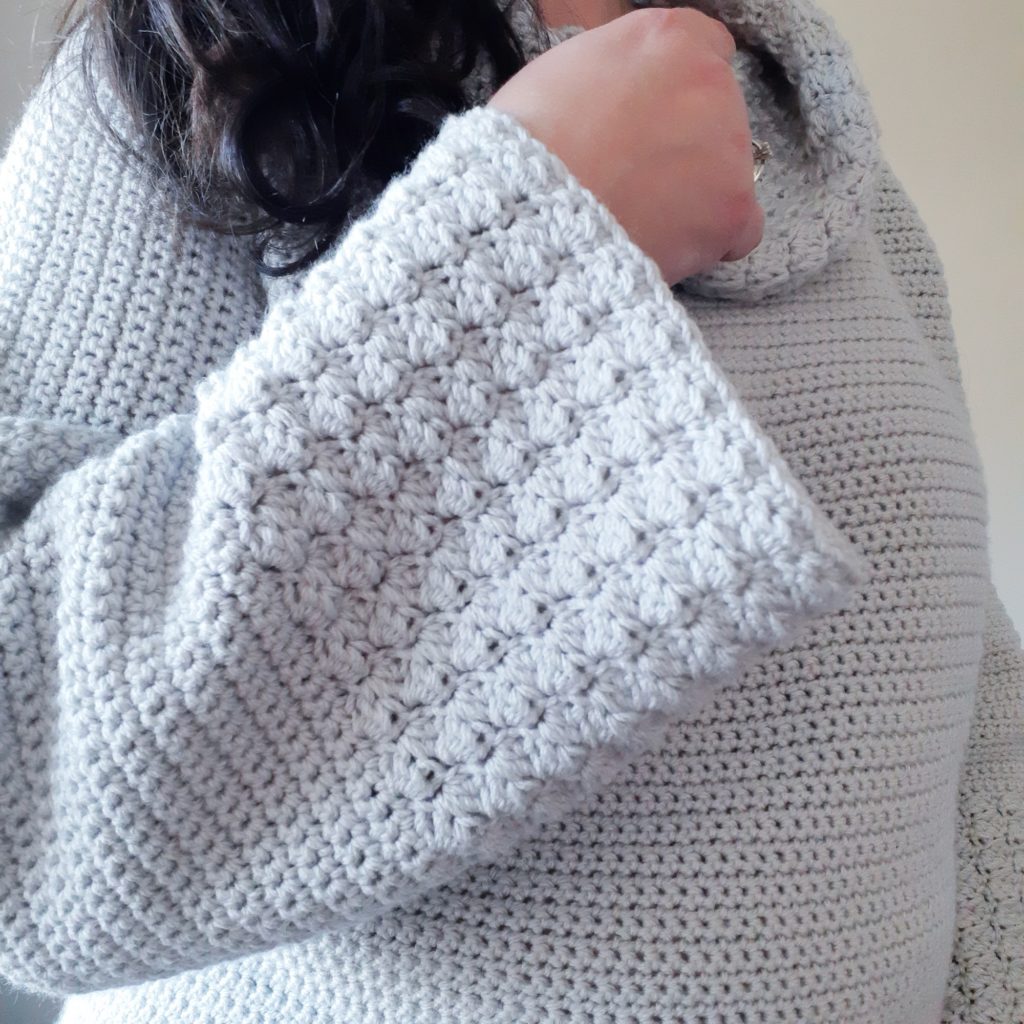
If you’re familiar with the Sedge Stitch you know it is an easy stitch, using just single crochet, half double and double. If you’re not familiar with this gorgeous stitch you can certainly find may tutorials online to guide you through this very easy yet satisfying stitch.
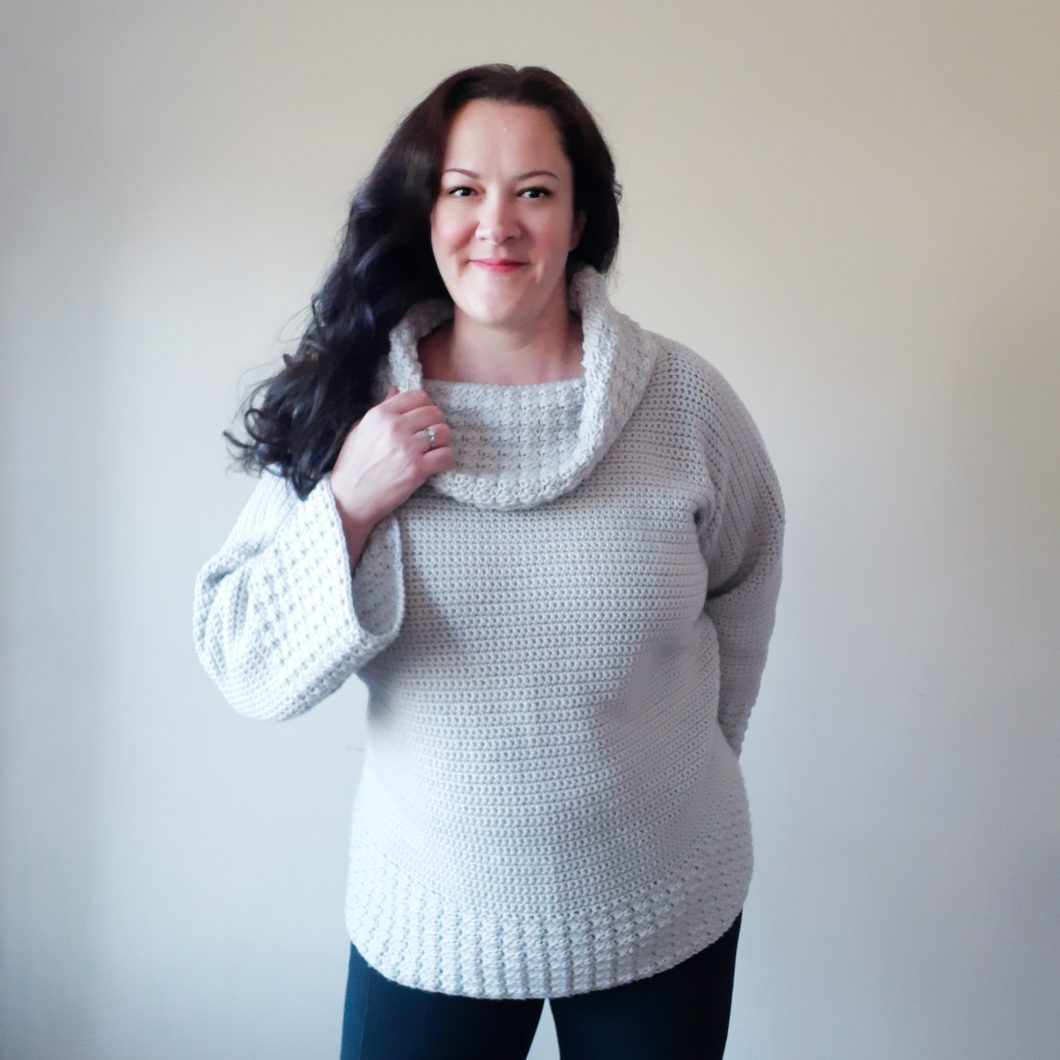
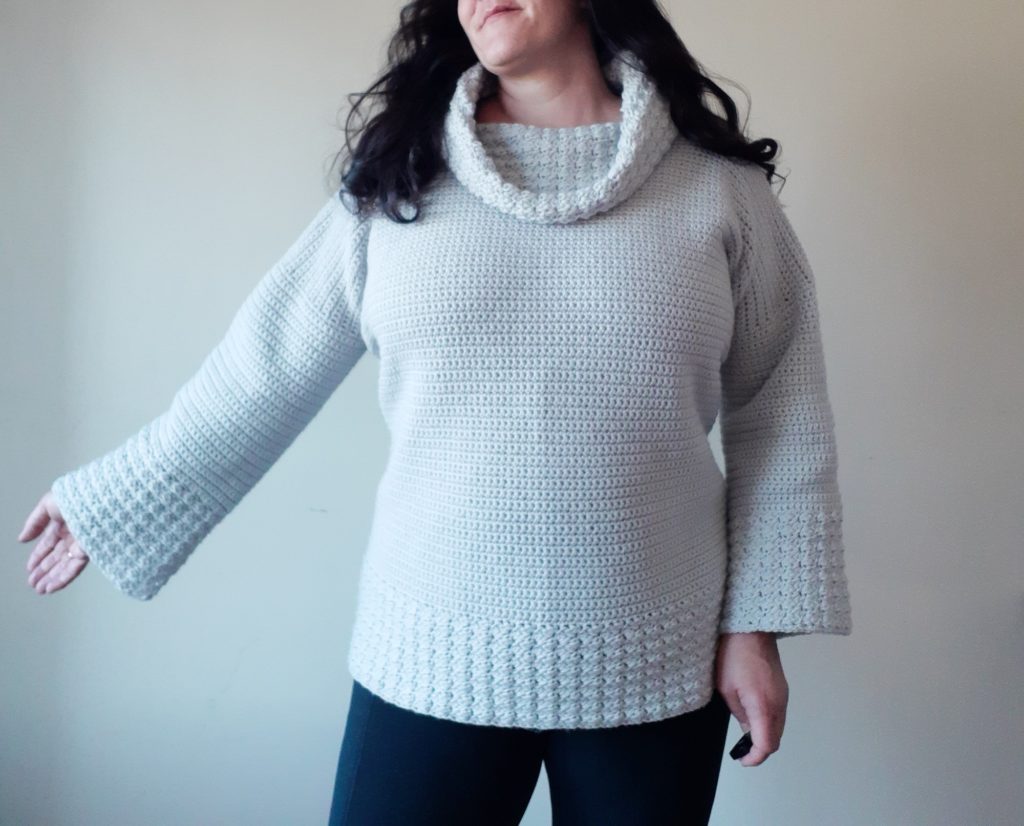
The remainder of this cozy crochet pullover sweater I wanted to keep the texture simple so it showcases the deep hems and cuffs. I used single crochet for the main body of the sweater. I think it also adds some nice, neat, clean lines and allows the sweater to drape nicely.
I used a lighter 3wt yarn (Bernat Baby Sport) to keep a larger piece like this from being too weighty. I also used a larger hook size than called for to keep the stitches a little more loose which adds to the nice drape.
LET’S GET MAKING! Scroll down for the FREE pattern below for this crochet pullover sweater OR you can PURCHASE the Ad-Free, printable version from my Etsy store HERE

| SUPPLY LIST |
| 6mm hook Any Category 3 light weight yarn (Yarn Used: Bernat Baby Sport in Baby Grey ) Approx yardage: XS: 1000y/925m, S: 1150y/1050m, M: 1350y1250m, L: 1500y/1375m, XL: 1700y/1550m, 2XL: 2000y/1825m, 3XL: 2200y/2000m, 4XL: 2350y/2150m, 5XL: 2500y/2300m Scissors Tape Measure Tapestry needle |
| STITCHES / ABBREVIATIONS |
| CH – chain ST – stitch SK 2 ST’s – skip 2 stitches SC – single crochet HDC – half double crochet DC – double crochet **The hem, sleeve cuffs and cowl neck portion of the sweater are done in Sedge Stitch, which is a combination of SC, HDC and DC, see notes section below*** |
| SIZES |
| XS, S, M, L, XL, 2XL, 3XL, 4XL, 5XL |
| FINISHED MEASUREMENTS |
| *The measurements are for width and length – to get circumference, double the width* XS: 14” width/23” length, S: 16” width/24” length, M: 18” width/25” length, L: 20” width/25” length, XL: 22” width/56” length, 2XL: 24” width/28” length, 3XL: 26” width/28” length, 4XL: 28” width/28” length, 5XL: 30” width, 28” length |
| GAUGE |
| For the Sedge Stitch portion – 6 rows x 14 stitches = 4” x 4” For the SC portion – 18 rows x 14 stitches = 4” x 4” |
| DIFFICULTY LEVEL |
| Intermediate |
PATTERN & SIZING NOTES:
– This sweater is created making 2 equal panels for the front and back to start then the sleeves are crocheted in pieces right on and finally the cowl neck is crocheted right on to the neckline. As such, the only assembly is joining the front and back panels at the shoulders and the only other assembly is seaming one continuous seam from the end of the sleeve down to the bottom hem on each side.
– The hems, sleeve cuffs and cowl neck are all created using the Sedge Stitch, which is a stitch in which you do the following: (SC, HDC and DC) all in one stitch, then SK 2 ST’s and continue (SC, HDC & DC) all in one ST etc etc. If you need assistance with the Sedge Stitch, you can find lots of tutorials online.
– The main body of this pullover sweater is done in single crochet.
– While doing the Sedge Stitch portions of the sweater, the CH 1 at the beginning of the row effectively counts as your first SC in the series, but for the ease of counting stitches in the row, I’m not counting it in the totals – as long as you maintain the consistent numbers and you always end with a SC in the CH1 from the row below after you’ve skipped 2 stitches, then you’ve got it right and don’t likely need to count out the stitches in your row. But if you so desire counting them, just don’t count the CH 1 at the beginning of the row.
– Sedge Stitch tip: because you’re SC’ing in to the CH 1 from the row below, try to keep you CH1’s fairly loose or they will be hard to SC in to.
– While doing the main body of the sweater in SC, do NOT place any ST’s in to the CH1’s from the rows below, simply SC as you would normally ending in a regular ST — the CH1 turning CH does NOT count as a ST at all.
– Use the following Size Key (*SK*) indicated in parentheses in reference to the size you are crocheting: (*SK*: XS, S, M, L, XL, 2XL, 3XL, 4XL, 5XL) – I suggest taking a highlighter to mark the appropriate sizing references for the size you’re crocheting, to make it easier to follow the pattern – Stitch count for each round will be indicated in parentheses ( ) at the end of the row.

INSTRUCTIONS:
FRONT & BACK PANELS:
* create 2 of these equal panels
CH (*SK*: 48, 57, 63, 69, 78, 84, 90, 99, 105) + 1 to turn
Row 1: In the 2nd CH from the hook, in the Back Bump of the starting CH, SC in each ST across, CH 1 & turn (*SK*: 48, 57, 63, 69, 78, 84, 91, 99, 105)
Rows 2 to 16: In the 1st ST from the hook, HDC and DC in to the same ST, then SK 2 ST’s, then [SC/HDC/DC all in the same ST, then SK 2 ST’s] and repeat [ to ] to the end of the row, ending with 2 SK’d ST’s and then SC in to the CH1 from the row below, CH 1 & turn (*SK*: 48, 57, 63, 69, 78, 84, 91, 99, 105)
Row 17: In the 1st ST from the hook, SC in each ST across, CH 1 & turn (*SK*: 48, 57, 63, 69, 78, 84, 90, 99, 105
**REPEAT Row 17 for the following total number of SC rows (not including the Sedge Stitch rows) according to the size you’re making (*SK*: 82, 86, 90, 90, 94, 94, 100, 100, 100)
Tie off
Assemble the Front & Back Panels:
– Put the 2 panels together with the right sides facing in toward each other and the hems at the bottom
– Count in the following number of stitches on each side and mark them, then using your tapestry needle, whip stitch each shoulder from the outside in for the appropriate number of stitches, leaving a neck hole (*SK*: 9, 12, 15, 18, 21, 24, 27, 29, 32)
– Turn the sweater right side out as we will now tie on and create the sleeves right from the main body of the sweater
SLEEVES:
* create 2 of these right from the main body of the sweater
– From the shoulder seam of your 2 panels, count the following number of rows on each side of the seam and mark each side, so you can tie on and begin the sleeves: (*SK*: 18, 18, 24, 24, 24, 30, 30, 30, 30)
Row 1: Starting in your marked row, SC all the way across, CH 1 & turn (*SK*: 36, 36, 48, 48, 48, 60, 60, 60, 60)
Row 2: In the 1st ST from the hook, SC in each ST across, CH 1 & turn (*SK*: 36, 36, 48, 48, 48, 60, 60, 60, 60)
**REPEAT Row 2 for the following total number or rows, after which we will complete the sleeve cuff in Sedge Stitch (*SK*: 41, 41, 45, 45, 49, 49, 49, 49, 49 )
Sedge Stitch Sleeve Cuff: Crochet cowl turtleneck sweater
Rows 1 to 15: In the 1st ST from the hook, HDC and DC in to the same ST, then SK 2 ST’s, then [SC/HDC/DC all in the same ST, then SK 2 ST’s] and repeat [ to ] to the end of the row, ending with 2 SK’d ST’s and then SC in to the CH1 from the row below, CH 1 & turn (*SK*: 36, 36, 48, 48, 48, 60, 60, 60, 60)
Row 16: In the 1st ST from the hook, SC in each ST across, tie off leaving a 4’ tail to seam your sides
COWL NECK: crochet pullover sweater
– Turn the sweater inside out so that the right sides are facing in at each other and find the middle stitch on one side of the neck – it doesn’t have the be the exact middle in that some sizes with have even or odd number of stitches and if you’ve off centre by 1 stitch it won’t much matter. This will be where the seam of your cowl is thus, this side of the sweater will now be the back of your sweater
Row 1: Tie on that back middle stitch and SC in each ST around, CH 1 & turn (66, 66, 66, 66, 72, 72, 72, 82, 82)
Row 2: In the 1st ST SC, then SC x 2 in the next ST and alternate between SC in 1 ST and 2 x SC in the next ST all the way across the row (*SK*: 99, 99, 99, 99, 108, 108, 108, 123, 123)
Row 3 to 26: In the 1st ST from the hook, HDC and DC in to the same ST, then SK 2 ST’s, then [SC/HDC/DC all in the same ST, then SK 2 ST’s] and repeat [ to ] to the end of the row, ending with 2 SK’d ST’s and then SC in to the CH1 from the row below, CH 1 & turn (*SK*: 99, 99, 99, 99, 108, 108, 108, 123, 123)
Row 27: In the 1st ST from the hook, SC in each ST around (*SK*: 99, 99, 99, 99, 108, 108, 108, 123, 123)
– Tie off with a 14” tail
– Using your tapestry needle, whip stitch to seam the cowl together from the top down to the neck opening
FINAL ASSEMBLY:
– Turn the sweater inside out so that the right sides are facing in at each other and line up your sleeve and side edges
– With the 4’ tail from the end of each sleeve, use your tapestry needle to whip stitch seam the sleeves from cuff to armpit and all the way down each side and tie off/secure.
– Weave in all your ends and voila, a cozy crochet turtleneck sweater perfect to ride out the winter months!