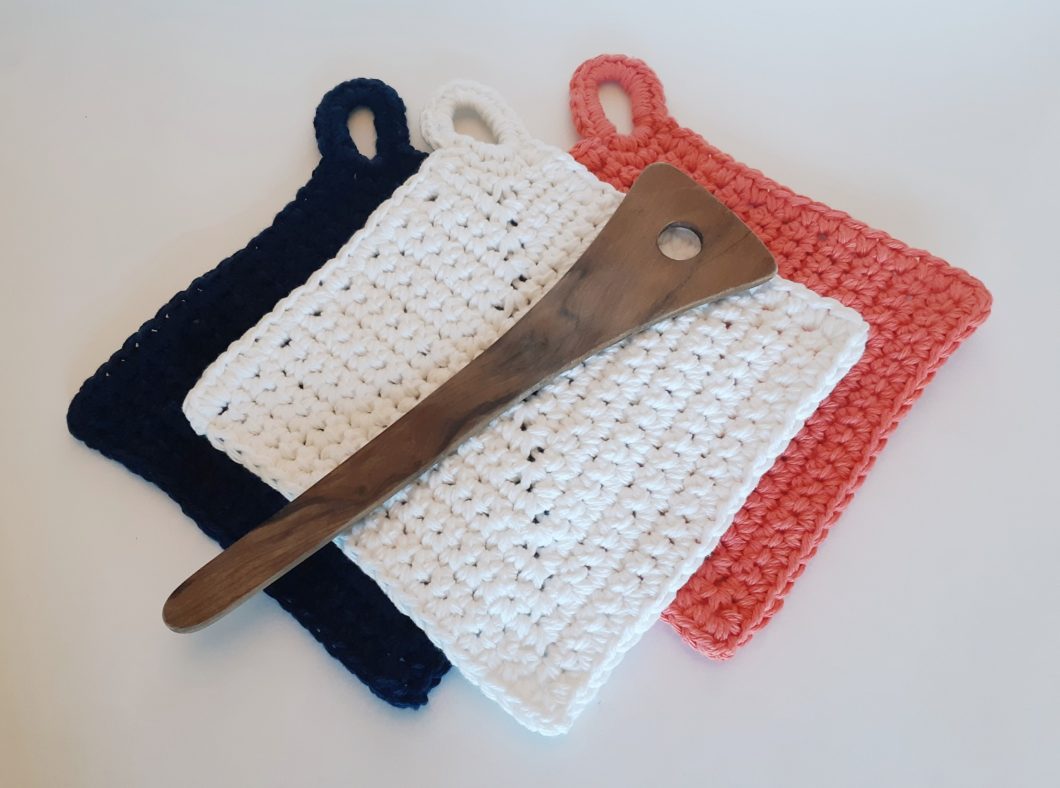
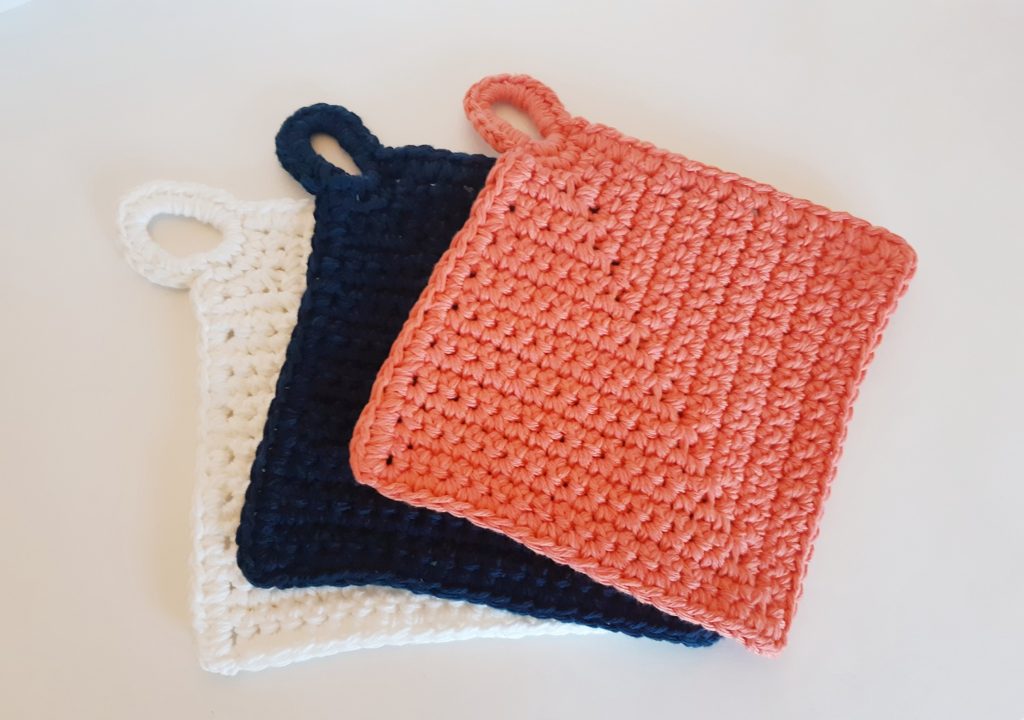
Today, I’m bringing you a super-simple pattern for crochet pot holders that are vintage-inspired but with a modern twist.
I have a confession to make. I’m not a very good shopper. Crowded malls and stores cause me to get a little on the cranky side. Heck, even the grocery store on a busy day gets me going (although I do love grocery shopping). Occasionally I fantasize about snipping the heels of the person blocking me from getting by them with my cart. But I digress…
As a result of my ineptitude as a consumer, when it comes time for gifts I really don’t enjoy the act of shopping for them. I’m always on the look-out for something I can create by hand. Obviously, my craft of choice is crochet, but that doesn’t preclude me from giving a kick-butt homemade chutney or a banana loaf.
This useful and beautiful vintage-inspired crochet hot pad is just the type of item I love whipping up quickly and giving as a gift with a new set of bamboo spoons or something of the like. This project is just one of several quick-working projects I’ll be publishing in the near future.
I designed them specifically to match my tastes and I will soon be making some in a beautiful grey to match my kitchen decor. I do think these crochet pot holders are simple enough, however, to appeal to a lot of people regardless of their decor style.
It’s always fun to have a few lighting-quick projects up one’s sleeve for a last minute gift. These Modern Vintage Pot Holders are a great addition to your repertoire!
If you’re looking for more crochet housewares, check out my River Pebble Spa Cloth, my Cocoon Hanging Basket and my Maison Verte Towel.

SUPPLY LIST – 6 mm hook, Yarn Used: Bernat Handicrafter Cotton (2 strands together), Approx 120 yards (110 metres), Scissors, Tapestry needle
STITCHES / ABBREVIATIONS – CH – chain, SL ST – slip stitcH, SC – single crochet
SIZES – N/A
FINISHED MEASUREMENTS – 8” height by 8” width (loop is additional 2”)
GAUGE – N/A
DIFFICULTY LEVEL – Beginner
PATTERN SIZING & NOTES –
– This crochet pot holder is made using 2 strands of cotton yarn together for enough thickness to be effective as a pot holder/hot pad
– It’s REALLY important to use cotton for this project as any synthetic yarns may melt in contact with hot items
INSTRUCTIONS –
HANGING LOOP
– Using 2 strands of yarn held together, CH 10 and SL ST together to join a loop, CH 1
– SC 20 around the loop, SL ST to join the round, CH 1
CROCHET POT HOLDER BODY
Row 1: SC in the same stitch as your CH 1, SC 4 more, CH 1 and turn (5)
Row 2: SC 2, SC 1 then CH 2 then SC 1 in same ST, SC 2, CH 1 and turn (6 + 2 CH)
Row 3: SC 3, SC 1 then CH 2 then SC 1 in same ST, SC 3, CH 1 and turn (8 + 2 CH)
Row 4: SC 4, SC 1 then CH 2 then SC 1 in same ST, SC 4, CH 1 and turn (10 + 2 CH)
Row 5: SC 5, SC 1 then CH 2 then SC 1 in same ST, SC 5, CH 1 and turn (12 + 2 CH)
Row 6: SC 6, SC 1 then CH 2 then SC 1 in same ST, SC 6, CH 1 and turn (14 + 2 CH)
Row 7: SC 7, SC 1 then CH 2 then SC 1 in same ST, SC 7, CH 1 and turn (16 + 2 CH)
Row 8: SC 8, SC 1 then CH 2 then SC 1 in same ST, SC 8, CH 1 and turn (18 + 2 CH)
Row 9: SC 9, SC 1 then CH 2 then SC 1 in same ST, SC 9, CH 1 and turn (20 + 2 CH)
Row 10: SC 10, SC 1 then CH 2 then SC 1 in same ST, SC 10, CH 1 and turn (22 + 2 CH)
Row 11: SC 11, SC 1 then CH 2 then SC 1 in same ST, SC 11, CH 1 and turn (24 + 2 CH)
Row 12: SC 12, SC 1 then CH 2 then SC 1 in same ST, SC 12, CH 1 and turn (26 + 2 CH)
Row 13: SC 13, SC 1 then CH 2 then SC 1 in same ST, SC 13, CH 1 and turn (28 + 2 CH)
Row 14: SC 14, SC 1 then CH 2 then SC 1 in same ST, SC 14, CH 1 and turn (30 + 2 CH)
Row 15: SC 15, SC 1 then CH 2 then SC 1 in same ST, SC 15, CH 1 and turn (32 + 2 CH)
Row 16: SC 16, SC 1 then CH 2 then SC 1 in same ST, SC 16, CH 1 and turn (34 + 2 CH)
Row 17: SC 17, SC 1 then CH 2 then SC 1 in same ST, SC 17, CH 1 and turn (36 + 2 CH)
Row 18: SC 18, SC 1 then CH 2 then SC 1 in same ST, SC 18, CH 1 and turn (38 + 2 CH)
Row 19: SC 19, SC 1 then CH 2 then SC 1 in same ST, SC 19, do NOT CH 1 and turn (40 + 2 CH)
CROCHET POT HOLDER EDGING:
– While still in the last ST of row 19, add 2 additional SC in that same stitch to turn the corner
– Work 17 SC in to the side of the pot holder and SL ST in to the aligning ST of the hanging loop
– Tie off and cut yarn
– Tie on/Join to the corresponding ST of the hanging loop on the other side of the hanging loop, CH 1
– SC 17 SC in to the side of the pot holder and add 2 additional ST in the corner ST to turn the corner, SL ST to the first stitch on the next side
– Tie off and cut yard
– Weave in ends with tapestry needle