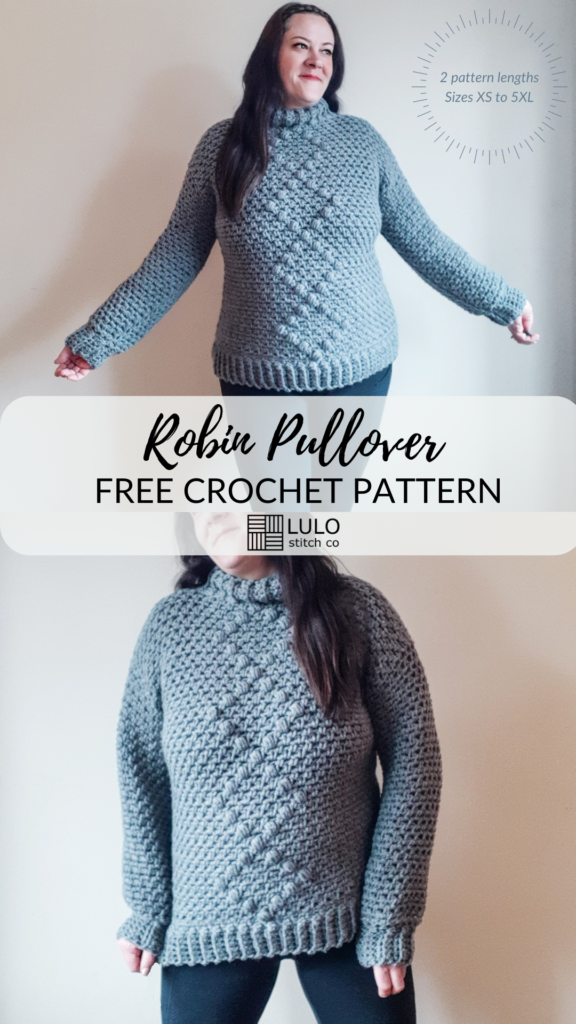
“ROBIN” CHUNKY CROCHET SWEATER
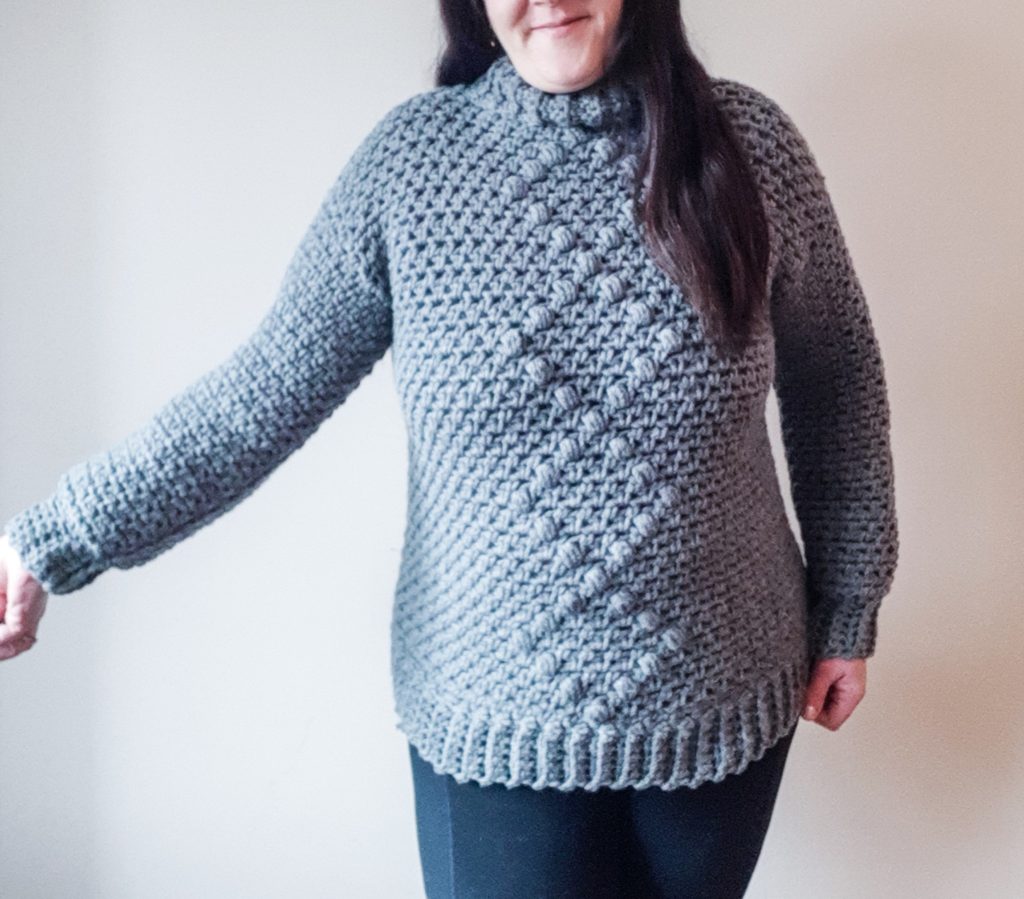
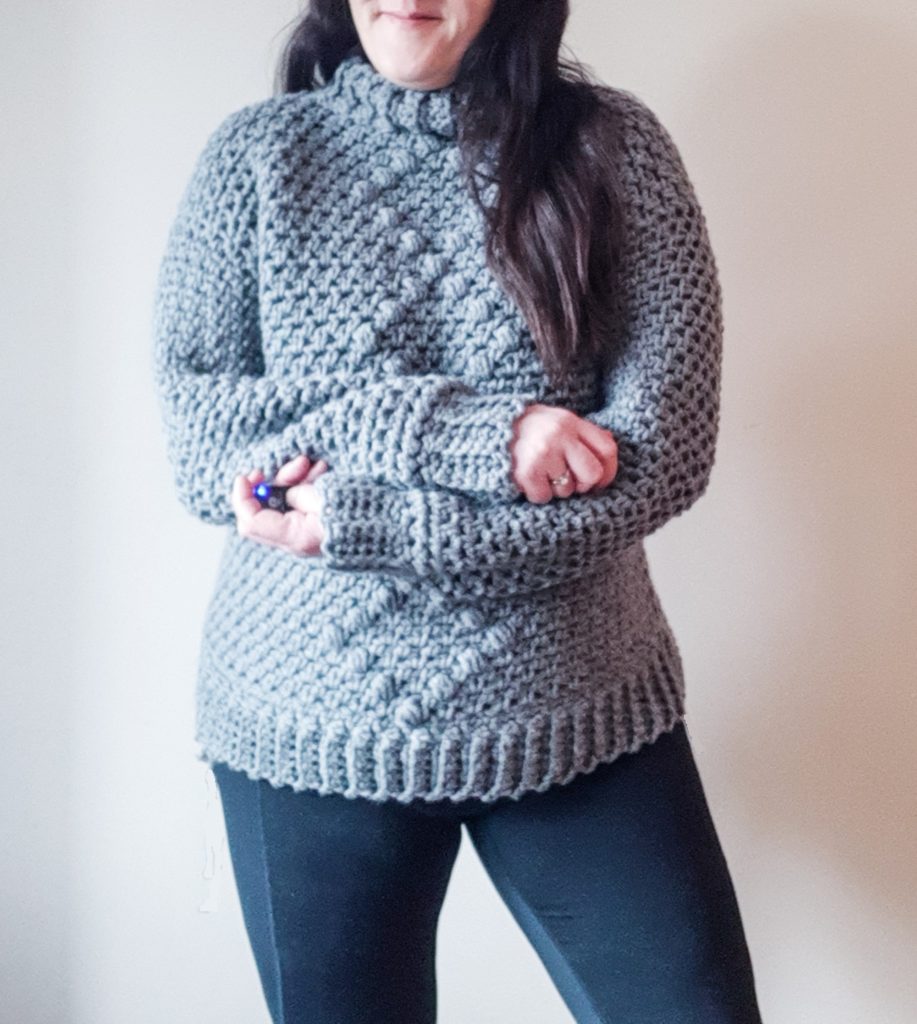
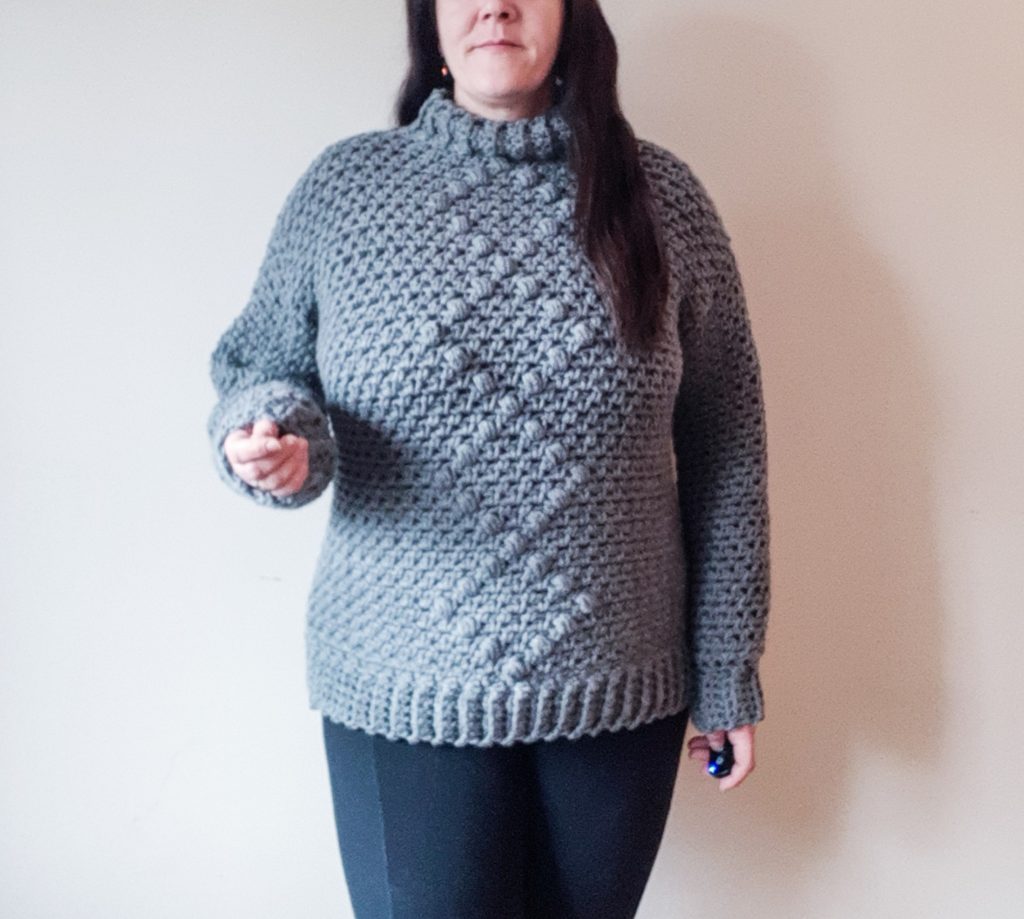
I’ll admit, I’ve never actually made a chunky crochet sweater before. As a woman of (ahem) ample proportions, I had always avoided chunky yarns for sweaters I was making for myself because I always felt they made me feel too bulky.
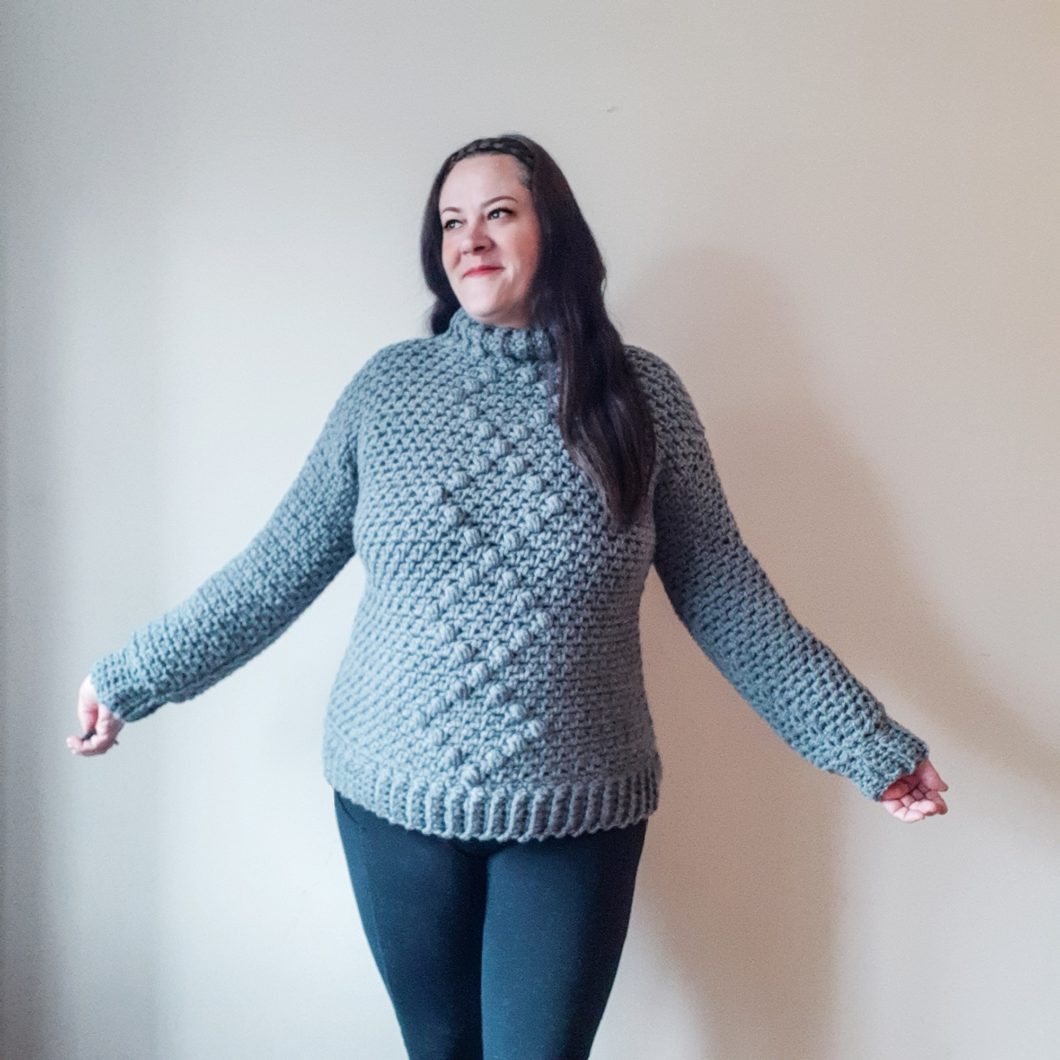
As you may have noticed, I do love the Moss / Linen / Granite stitch, and you know what? This is such an amazing stitch to make something feel waaaaaaaay less bulky, even if using a super bulky yarn. The stretch and drape of this stitch hugs in all the right places and also lends itself to a thinner texture on a whole. It really doesn’t feel bulky at all 🙂
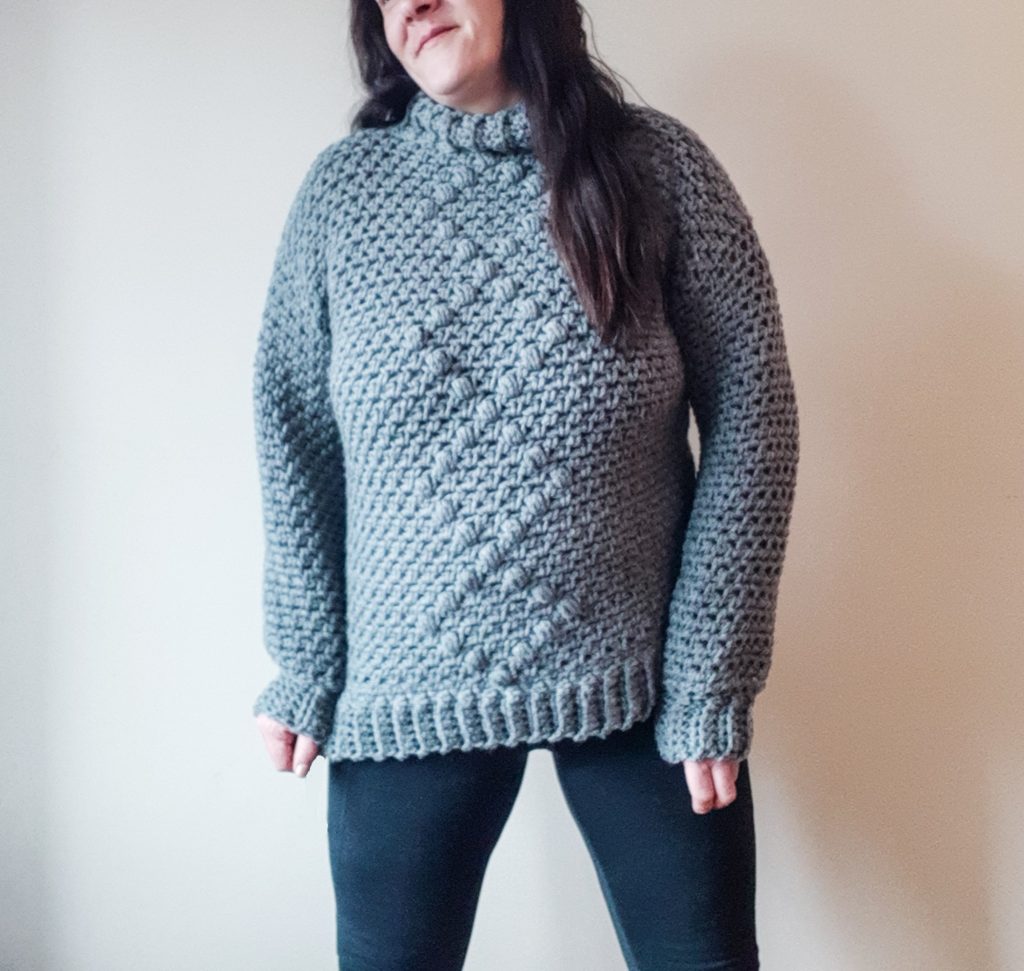
Combine the Moss stitch with a cute puff stitch diamond motif o give it a little more texture and you have an amazing pairing for one of the coziest chunky crochet sweaters known to woman. I plan to wear mine the rest of this season.
I’ve written a fairly simple pattern here (all made as 1 piece!), but one that offers 2 length options: a waist length option and a pelvic area length option. The pattern is also fairly customizable in terms of the arm length… heck, you could even add 3 or 4 more of the diamond motifs and turn it in to a gorgeous sweater dress (future project for me?)!
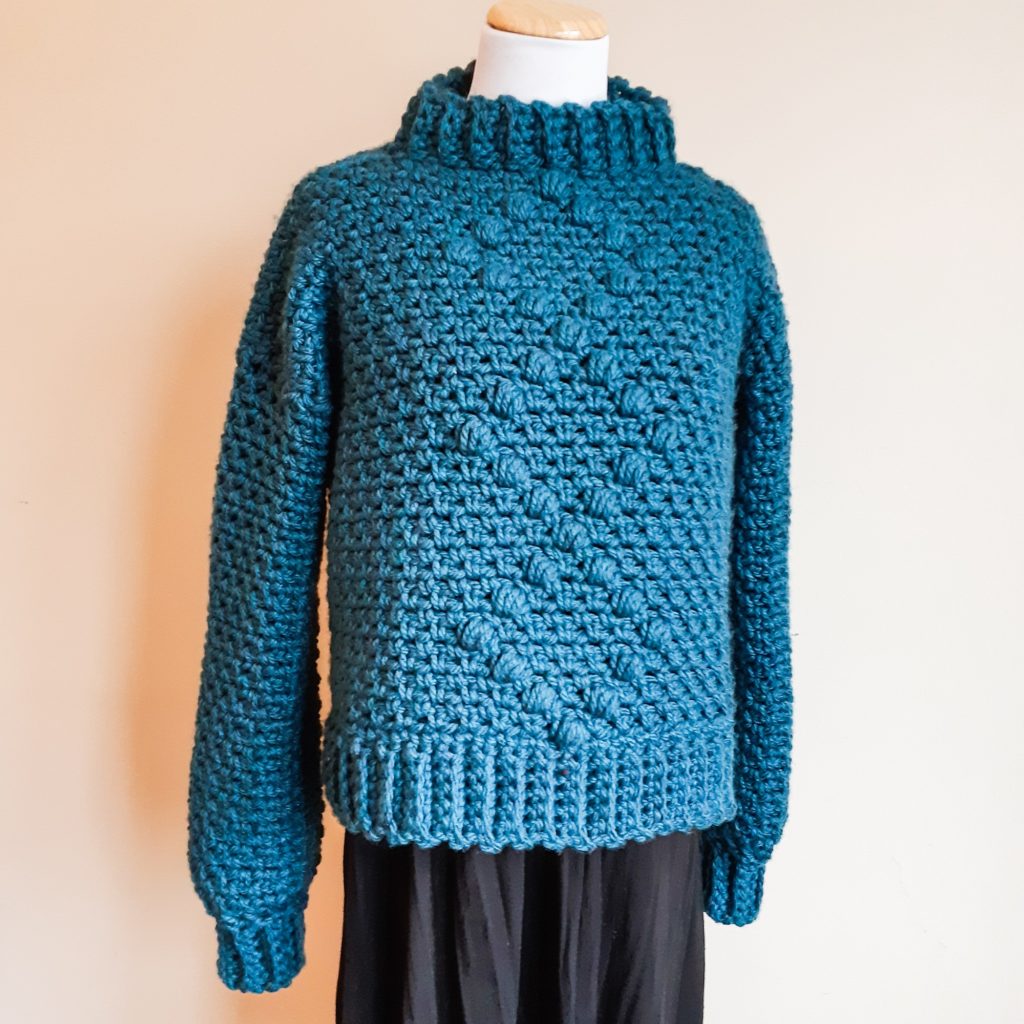
In this pattern I have crocheted the ribbed cuffs, hem and neck directly on to the piece but if you aren’t familiar or comfortable with that technique, you could make them separately and sew them on.
For more sweater ideas like this chunky crochet sweater, check out my Meadow Pullover or Mariposa Summer Sweater. For more projects with this awesome chunky yarn, why don’t you take a look at my Faith Throw or Sunday Throw.
LET’S GET MAKING! Scroll down for the FREE pattern for this chunky crochet pullover below OR you can PURCHASE the Ad-Free, printable version from my Etsy store HERE.
SUPPLY LIST:
10mm hook
Any Category 6 – super bulky yarn (Yarn Used: Bernat Softee Chunky in True Grey)
Approx yardage for longer version of this chunky crochet sweater (the shorter version will be slightly less that the yardage given below): XS: 430y/390m, S: 535y/485m, M: 645y/585m, L: 750y/680m, XL: 860y/780m, 2XL: 975y/890m, 3XL: 1075y/975m, 4XL: 1300y/1200m, 5XL: 1510y/1365m
Scissors Tapestry needle
STITCHES & ABBREVIATIONS:
CH – chain
ST – stitch
SK ST – skip stitch
SC – single crochet
SC2tog – single crochet 2 together for a decrease
SCBLO – single crochet in the back loop only
MS – moss stitch
PS – puff stitch **see notes below regarding puff stitch
SIZES:
XS, S, M, L, XL, 2XL, 3XL, 4XL, 5XL
FINISHED MEASUREMENTS:
Shorter Version
(W x L only, for circumference, double the width)
XS: 16” W x 20” L
S: 17” W x 20” L
M: 19” W x 20” L
L: 21” W x 20” L
XL: 22” W x 20” L
2XL: 24” W x 20” L
3XL: 26” W x 20” L
4XL: 27” W x 20” L
5XL: 29” W x 20” L
Longer Version
(W x L only, for circumference, double the width)
XS: 16” W x 25” L
S: 17” W x 25” L
M: 19” W x 25” L
L: 21” W x 25” L
XL: 22” W x 25” L
2XL: 24” W x 25” L
3XL: 26” W x 25” L
4XL: 27” W x 25” L
5XL: 29” W x 25” L
GAUGE:
9 rows x 9.5 stitches = 4” x 4”
DIFFICULTY LEVEL:
Intermediate
PATTERN & SIZING NOTES:
– This chunky crochet pulover pattern is available for 2 lengths (shorter length ends at waist, longer length ends at pelvic area)
– The pattern will be written for the shorter length with the additional instructions for the longer length added in as the pattern goes along
– This sweater uses MOSS STITCH and a *modified* PUFF STITCH. If you are not familiar and require a tutorial on how to do these, please refer to the following links for video tutorials:
* Moss Stitch: https://www.youtube.com/watch?v=kvuFTM4wfMk
* Puff Stitch: https://www.youtube.com/watch?v=N83f0OPlzFQ
– This chunky crochet sweater also uses a technique of crocheting the ribbing right on to the work instead of creating it separately and sewing it on afterward. If you are not familiar and require a tutorial on how to do this, please refer to the following link: https://www.youtube.com/watch?v=oM5qMrw8fxY
– Please note the modifications for my Puff Stitch: since we are working the moss stitch on either side of the puff stitches, do not SC after a puff stitch, but CH 1 instead as though the Puff were just another SC in your moss stitch row
– Please note this pattern will refer to Moss Stitch as MS henceforth, indicating the following repeat: SC/CH1/SK ST
– The Puff stitches are worked on the wrong side of the piece
– The pullover is made as one piece and seamed from the sleeve ends to under the arms and down the sides
– Turning chains count as a stitch.
– Use the following Size Key (*SK*) indicated in parentheses in reference to the size you are crocheting for this chunky crochet sweater: (*SK*: XS, S, M, L, XL, 2XL, 3XL, 4XL, 5XL) – I suggest taking a highlighter to mark the appropriate sizing references for the size you’re crocheting, to make it easier to follow the pattern – Stitch count for each round will be indicated in parentheses ( ) at the end of the row
INSTRUCTIONS:
FRONT PORTION:
* this chunky crochet sweater is made as one continuous piece with a neck hole
* reminder this is written for the shorter length with notes on changes for the
* Reminder: all the PS are basically replacing a SC in a row of MS, so all the PS’s have a CH1 and SK ST after them
CH (*SK*: 37, 41, 45, 49, 53, 57, 61, 65, 69)
Row 1: In the 2nd CH from the hook (in the Back Bump of the starting CH) SC in each ST across, CH 2 & turn (*SK*: 37, 41, 45, 49, 53, 57, 61, 65, 69)
Row 2: SC in the 2nd ST from the CH & do MS repeat to ST # 27 & place 1 PS, then CH 1/SK ST and repeat MS to the end of the row, CH 2 & turn (*SK*: 37, 41, 45, 49, 53, 57, 61, 65, 69)
Row 3: MS across the row (*SK*: 37, 41, 45, 49, 53, 57, 61, 65, 69)
Row 4: MS across the row placing PS’s at ST #’s 25 & 29, CH 2 & turn (*SK*: 37, 41, 45, 49, 53, 57, 61, 65, 69)
Row 5: MS across the row (*SK*: 37, 41, 45, 49, 53, 57, 61, 65, 69)
Row 6: MS across the row placing PS’s at ST #’s 23 & 31, CH 2 & turn (*SK*: 37, 41, 45, 49, 53, 57, 61, 65, 69)
Row 7: MS across the row (*SK*: 37, 41, 45, 49, 53, 57, 61, 65, 69)
Row 8: MS across the row placing PS’s at ST #’s 21 & 33, CH 2 & turn (*SK*: 37, 41, 45, 49, 53, 57, 61, 65, 69)
Row 9: MS across the row (*SK*: 37, 41, 45, 49, 53, 57, 61, 65, 69)
Row 10: MS across the row placing PS’s at ST #’s 23 & 31, CH 2 & turn (*SK*: 37, 41, 45, 49, 53, 57, 61, 65, 69)
Row 11: MS across the row (*SK*: 37, 41, 45, 49, 53, 57, 61, 65, 69)
Row 12: MS across the row placing PS’s at ST #’s 25 & 29, CH 2 & turn (*SK*: 37, 41, 45, 49, 53, 57, 61, 65, 69)
Row 13: MS across the row (*SK*: 37, 41, 45, 49, 53, 57, 61, 65, 69)
Row 14: MS across the row placing a PS at ST # 27, CH 2 & turn (*SK*: 37, 41, 45, 49, 53, 57, 61, 65, 69)
Row 15: MS across the row (*SK*: 37, 41, 45, 49, 53, 57, 61, 65, 69)
Row 16 to 39: Repeat rows 4 to 15 three times ending on a row of MS, CH 2 to turn for neck hole row (*SK*: 37, 41, 45, 49, 53, 57, 61, 65, 69)
***FOR LARGER LENGTH of this chunky crochet pullover: Repeat rows 1 to 15 four times instead of 3, for a total of 51 rows
NECK HOLE ROW:
Do MS across the row except CH & SK ST’s for the following #’s according to your size
XS: MS x 11, CH & SK ST x 15, MS x 11
S: MS x 13, CH & SK ST x 15, MS x 13
M: MS x 13, CH & SK ST x 19, MS x 13
L: MS x 15, CH & SK ST x 19, MS x 15
XL: MS x 17, CH & SK ST x 19, MS x 17
2XL: MS x 19, CH & SK ST x 19, MS x 19
3XL: MS x 21, CH & SK ST x 19, MS x 21
4XL: MS x 23, CH & SK ST x 19, MS x 23
5XL: MS x 25, CH & SK ST x 19, MS x 25
At the end of the row, CH 2 & turn (*SK*: 37, 41, 45, 49, 53, 57, 61, 65, 69)
BACK PORTION:
Rows 1 to 38: MS across the row, CH 2 & turn (*SK*: 37, 41, 45, 49, 53, 57, 61, 65, 69)
Row 39: SC across the row, then CH 7 — and do not tie off as we’re starting the ribbed hem on the back panel (*SK*: 37, 41, 45, 49, 53, 57, 61, 65, 69)
***FOR LARGER LENGTH of this chunky crochet pullover: MS across the row for 12 additional rows and then do 1 row of SC for a total of 51 rows
RIBBED HEM ON MAIN BODY OF SWEATER:
* The ribbed hem along the bottom of each panel basically goes upon this repeat along the bottom of the piece : SCBLO up the row, SCBLO down the row and SL ST in to the following 2 ST’s from the main body of the sweater, turn, SC in the BLO back up
– Using the CH 7 from the end of row 39, turn the work so that you will now work along the bottom hem of the sweater…
Row 1: in the 2nd CH from the hook, SC in the back bump of your starting chain, SL ST in to the ST you started in and SL ST in to the next ST as well, turn your work (6)
Row 2: skipping what looks like 2 stitches (which are really just your SL ST’s), in what looks like the 3rd ST, SCBLO up the row, CH 1 & turn (6)
Row 3: SCBLO down the row, SL ST in to the next 2 ST on the main body of the sweater, turn your work (6)
Row 4 to the end (row # depends on size, *SK*: 37, 41, 45, 49, 53, 57, 61, 65, 69): repeat rows 2 & 3 to end (6)
Tie off
Tie on to the bottom front of the sweater to work along the hem and repeat the above instructions.
SLEEVES:
On the sides of the piece at the top of the shoulders, mark the row that is the neck hole row with a marker and count down either side the following amount and mark these too:
XS: count down 14 on either side of the neck hole marker
S: count down 14 on either side of the neck hole marker
M: count down 16 on either side of the neck hole marker
L: count down 16 on either side of the neck hole marker
XL: count down 18 on either side of the neck hole marker
2XL: count down 18 on either side of the neck hole marker
3XL: count down 20 on either side of the neck hole marker
4XL: count down 22 on either side of the neck hole marker
5XL: count down 22 on either side of the neck hole marker
Tie on and CH 2, remover the middle marker
Do the following number of rows related to your size (*SK*: 31, 31, 33, 33, 37, 37, 39, 39, 39)
All rows: MS across the row from marker to marker and on the last row, CH 1 (*SK*: 29, 29, 33, 33, 37, 37, 41, 45, 45)
After your last row of MS: SC2tog in each ST across (the CH 1 at the beginning of the row no longer counts as a stitch), then CH 7 to start the hem on the sleeve (*SK*: 14, 14, 16, 16, 18, 18, 20, 22, 22)
RIBBED CUFF ON SLEEVE:
* The ribbed cuff along the bottom of each sleeve follows the same principle as the hem on the bottom of the sweater
– Using the CH 7 from the end of your decrease row, turn the work so that you will now work along the stitches you just completed…
Row 1: in the 2nd CH from the hook, SC in the back bump of your starting chain, SL ST in to the ST you started in and SL ST in to the next ST as well, turn your work (6)
Row 2: skipping what looks like 2 stitches (which are really just your SL ST’s), in what looks like the 3rd ST, SCBLO up the row, CH 1 & turn (6)
Row 3: SCBLO down the row, SL ST in to the next 2 ST on the main body of the sweater, turn your work (6)
Row 4 to the end (row # depends on size, *SK*: 14, 14, 16, 16, 18, 18, 20, 22, 22): repeat rows 2 & 3 to end (6)
Tie off
Repeat the all the instructions above for the other sleeve
RIBBED MOCK TURTLENECK:
– Identify the stitch in the middle of the back of the neckline hole and tie on, then CH 7
Row 1: in the 2nd CH from the hook, SC in the back bump of your starting chain, SL ST in to the ST you started in and SL ST in to the next ST as well, turn your work (6)
Row 2: skipping what looks like 2 stitches (which are really just your SL ST’s), in what looks like the 3rd ST, SCBLO up the row, CH 1 & turn (6)
Row 3: SCBLO down the row, SL ST in to the next 2 ST on the main body of the sweater, turn your work (6)
Row 4 to the end (row # depends on size, *SK*: 30, 30, 38, 38, 38, 38, 38, 38, 38): repeat rows 2 & 3 to end (6)
When your rows are complete, you can either crochet the two sides of the ribbed neck together on the inside, or you can cut a long tail and seam down the 6 stitches with your tapestry needle.
FINAL ASSEMBLY:
– Turn the sweater inside out so that the right sides are facing in at each other and line up your sleeve and side edges – you can use markers to hold it together if you like, I usually do this at the armpit only
– With a 4.5’ piece of yarn, from the end of each sleeve, use your tapestry needle to whip stitch (or any seaming technique of your choice) starting from the end of the sleeve cuff to the armpit and all the way down each side and tie off/secure.
– Weave in all your ends and voila, an uber-cozy chunky crochet sweater you can wear all winter, every winter!