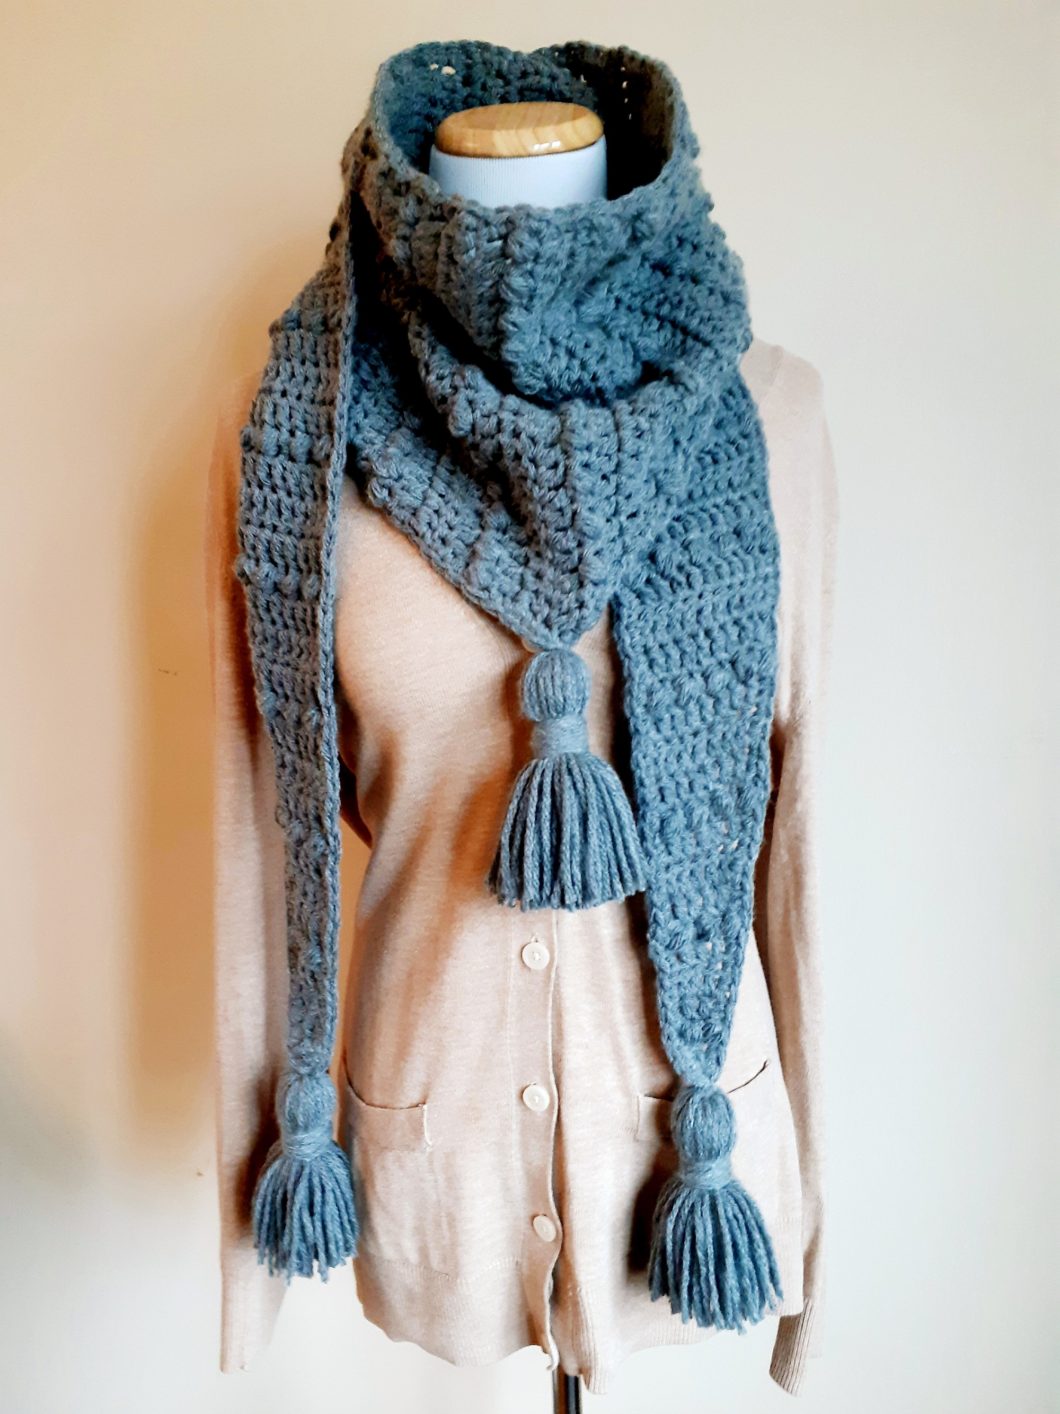
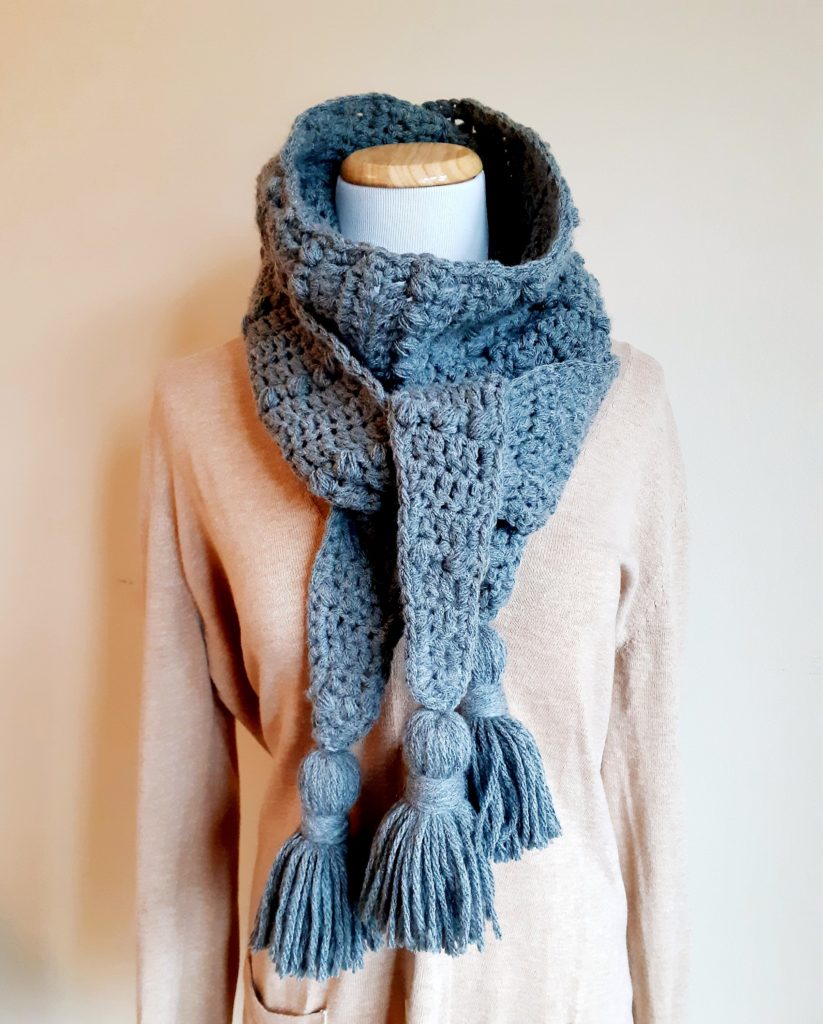
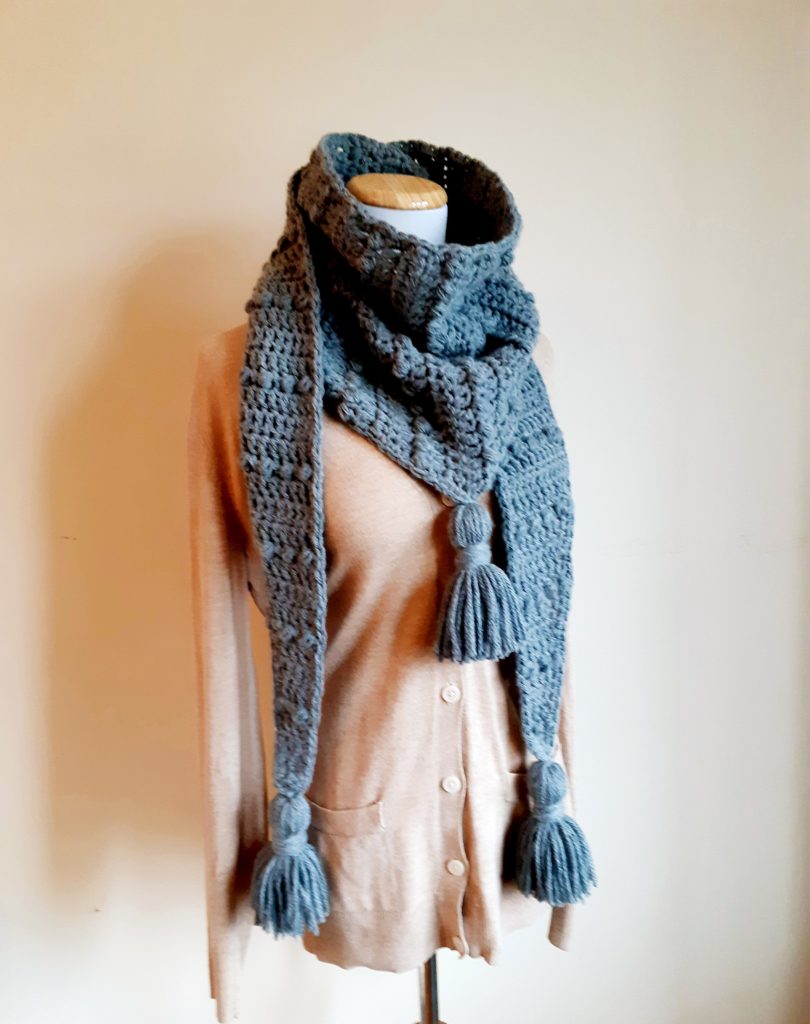
“VANTAGE” CROCHET TRIANGLE SCARF
I really do love triangle scarves. They’re far more versatile than a cowl but can look like one. They can act like a regular scarf or be worn in the style of a wrap. Then when you add in the visual interest of the thick and chunky tassels, I’m just a sucker.
While this is not my first crochet triangle scarf, it is the first one for which I’m publishing a pattern. And there will me more… oh there will be more!
You all can likely tell by now I like my neutral color palette. I apologize and I promise I’ll get better at mixing in more color. But I can’t help myself when I’m making for myself, greys and taupes and whites just go with everything and I’m a big fan of versatility.
One thing I did want to do with this crochet triangle scarf, however, is play with a little more texture. That’s why I’ve used the single crochet puff stitch in vertical lines on this scarf, which help elongate it. Well, the single crochet puff stitch slightly modified anyway. My version pulls through 3 lines instead of 4 so it’s a puff that’s a little more subtle.
This project may take a bit more time than a usual scarf, but it really is an fairly easy one since it’s all double crochet or variations on single crochet with the puffs.
For more scarves, check out my Diosa Hoodie Cowl, my Stonehaven Cowl and my Brighton Super Scarf.
LET’S GET MAKING! Scroll down for the free pattern for this crochet triangle scarf OR you can get the Ad-Free, printable version from my Etsy store HERE
| SUPPLY LIST |
| 7mm hook Any Category 4 WW yarn Yarn Used: Caron One Pound (4wt) in Medium Grey Approx yardage: 400 yards/365 metres Scissors, Tapestry needle |
| STITCHES / ABBREVIATIONS |
| YO – yarn over ST – stitch SL ST – slip stitch CH – chain SC – single crochet SCPS – single crochet puff stitch SC2tog – single crochet 2 together (decrease) DC – double crochet |
| SIZES |
| One size fits all for this crochet triangle scarf |
| FINISHED MEASUREMENTS |
| 72” width by 12.5” length (at longest point) – does not include tassel lengths |
| GAUGE |
| Not important |
| DIFFICULTY LEVEL |
| Intermediate |
| PATTERN & SIZING NOTES |
| – This crochet triangle scarf is made from end to end vertically, so we work it long corner to long corner – This scarf alternates between 3 rows of DC and 1 row of SCPS – In this version of the scarf our puff stitch contains only 3 x ‘yarn over & pull throughs’ as opposed to 4 which is normally used – This scarf contains all increases/decreases in every EVEN row while all ODD rows contain no increases or decreases – To wash/care instructions: This is an acrylic scarf, so the suggestion is to wash on gentle setting, then shape and lay flat to dry – if attaching tassels permanently, the suggestion is to tie a hair elastic as close to the end of the tassel as you can to keep it from fraying during washing. |
INSTRUCTIONS for the “VANTAGE” CROCHET TRIANGLE SCARF:
** Reminder, this SCPS is done with only 3 YO’s and not 4 like usual, I wanted a smaller and more subtle puff on this scarf. If you want to do it the traditional way, by all means, but this pattern is done with 3 YO’s
Here is where we begin to increase for the crochet triangle scarf…
CH 3 to start
Row 1: in the 3rd CH from the hook, DC x 1, CH 2 & turn (1)
Row 2: DC x 2 in that one stitch, CH 2 & turn (2)
Row 3: DC in each ST across, CH 1 & turn (2)
Row 4: SC x 1 then 1 x SCPS and 1 SC in the 2nd ST, CH 2 & turn (3)
Row 5: DC in each ST across, CH 2 & turn (3)
Row 6: DC in each ST across adding 2 DC in the last ST, CH 2 & turn (4)
Row 7: DC in each ST across, CH 1 & turn (4)
Row 8: SC x 1 then alternate SCPS and SC’s across making sure the last stitch has a SCPS and a SC in the same stitch, CH 2 & turn (5)
Row 9: DC in each ST across, CH 2 & turn (5)
Row 10: DC in each ST across adding 2 DC in the last ST, CH 2 & turn (6)
Row 11: DC in each ST across, CH 1 & turn (6)
Row 12: SC x 1 then alternate SCPS and SC’s across making sure the last stitch has a SCPS and a SC in the same stitch, CH 2 & turn (7)
Row 13: DC in each ST across, CH 2 & turn (7)
Row 14: DC in each ST across adding 2 DC in the last ST, CH 2 & turn (8)
Row 15: DC in each ST across, CH 1 & turn (8)
Row 16: SC x 1 then alternate SCPS and SC’s across making sure the last stitch has a SCPS and a SC in the same stitch, CH 2 & turn (9)
Row 17: DC in each ST across, CH 2 & turn (9)
Row 18: DC in each ST across adding 2 DC in the last ST, CH 2 & turn (10)
Row 19: DC in each ST across, CH 1 & turn (10)
Row 20: SC x 1 then alternate SCPS and SC’s across making sure the last stitch has a SCPS and a SC in the same stitch, CH 2 & turn (11)
Row 21: DC in each ST across, CH 2 & turn (11)
Row 22: DC in each ST across adding 2 DC in the last ST, CH 2 & turn (12)
Row 23: DC in each ST across, CH 1 & turn (12)
Row 24: SC x 1 then alternate SCPS and SC’s across making sure the last stitch has a SCPS and a SC in the same stitch, CH 2 & turn (13)
Row 25: DC in each ST across, CH 2 & turn (13)
Row 26: DC in each ST across adding 2 DC in the last ST, CH 2 & turn (14)
Row 27: DC in each ST across, CH 1 & turn (14)
Row 28: SC x 1 then alternate SCPS and SC’s across making sure the last stitch has a SCPS and a SC in the same stitch, CH 2 & turn (15)
Row 29: DC in each ST across, CH 2 & turn (15)
Row 30: DC in each ST across adding 2 DC in the last ST, CH 2 & turn (16)
Row 31: DC in each ST across, CH 1 & turn (16)
Row 32: SC x 1 then alternate SCPS and SC’s across making sure the last stitch has a SCPS and a SC in the same stitch, CH 2 & turn (17)
Row 33: DC in each ST across, CH 2 & turn (17)
Row 34: DC in each ST across adding 2 DC in the last ST, CH 2 & turn (18)
Row 35: DC in each ST across, CH 1 & turn (18)
Row 36: SC x 1 then alternate SCPS and SC’s across making sure the last stitch has a SCPS and a SC in the same stitch, CH 2 & turn (19)
Row 37: DC in each ST across, CH 2 & turn (19)
Row 38: DC in each ST across adding 2 DC in the last ST, CH 2 & turn (20)
Row 39: DC in each ST across, CH 1 & turn (20)
Row 40: SC x 1 then alternate SCPS and SC’s across making sure the last stitch has a SCPS and a SC in the same stitch, CH 2 & turn (21)
Row 41: DC in each ST across, CH 2 & turn (21)
Row 42: DC in each ST across adding 2 DC in the last ST, CH 2 & turn (22)
Row 43: DC in each ST across, CH 1 & turn (22)
Row 44: SC x 1 then alternate SCPS and SC’s across making sure the last stitch has a SCPS and a SC in the same stitch, CH 2 & turn (23)
Row 45: DC in each ST across, CH 2 & turn (23)
Row 46: DC in each ST across adding 2 DC in the last ST, CH 2 & turn (24)
Row 47: DC in each ST across, CH 1 & turn (24)
Row 48: SC x 1 then alternate SCPS and SC’s across making sure the last stitch has a SCPS and a SC in the same stitch, CH 2 & turn (25)
Row 49: DC in each ST across, CH 2 & turn (25)
Row 50: DC in each ST across adding 2 DC in the last ST, CH 2 & turn (26)
Row 51: DC in each ST across, CH 1 & turn (26)
Row 52: SC x 1 then alternate SCPS and SC’s across making sure the last stitch has a SCPS and a SC in the same stitch, CH 2 & turn (27)
Row 53: DC in each ST across, CH 2 & turn (27)
Row 54: DC in each ST across adding 2 DC in the last ST, CH 2 & turn (28)
Row 55: DC in each ST across, CH 1 & turn (28)
Row 56: SC x 1 then alternate SCPS and SC’s across making sure the last stitch has a SCPS and a SC in the same stitch, CH 2 & turn (29)
Row 57: DC in each ST across, CH 2 & turn (29)
Row 58: DC in each ST across adding 2 DC in the last ST, CH 2 & turn (30)
Row 59: DC in each ST across, CH 1 & turn (30)
Here is where we begin to decrease for the crochet triangle scarf…
Row 60: SC x 1 then alternate SCPS and SC’s across until you get to the last 3 ST where you will SC2tog in the 2nd and 3rd last ST and then SCPS in the last ST, CH 2 & turn (29)
Row 61: DC in each ST across, CH 2 & turn (29)
Row 62: DC in each ST across except the last 2 stitches where you will DC2tog for a decrease, CH 2 & turn (28)
Row 63: DC in each ST across, CH 1 & turn (28)
Row 64: SC x 1 then alternate SCPS and SC’s across until you get to the last 3 ST where you will SC2tog in the 2nd and 3rd last ST and then SCPS in the last ST, CH 2 & turn (27)
Row 65: DC in each ST across, CH 2 & turn (27)
Row 66: DC in each ST across except the last 2 stitches where you will DC2tog for a decrease, CH 2 & turn (26)
Row 67: DC in each ST across, CH 1 & turn (26)
Row 68: SC x 1 then alternate SCPS and SC’s across until you get to the last 3 ST where you will SC2tog in the 2nd and 3rd last ST and then SCPS in the last ST, CH 2 & turn (25)
Row 69: DC in each ST across, CH 2 & turn (25)
Row 70: DC in each ST across except the last 2 stitches where you will DC2tog for a decrease , CH 2 & turn (24)
Row 71: DC in each ST across, CH 1 & turn (24)
Row 72: SC x 1 then alternate SCPS and SC’s across until you get to the last 3 ST where you will SC2tog in the 2nd and 3rd last ST and then SCPS in the last ST, CH 2 & turn (23)
Row 73: DC in each ST across, CH 2 & turn (23)
Row 74: DC in each ST across except the last 2 stitches where you will DC2tog for a decrease, CH 2 & turn (22)
Row 75: DC in each ST across, CH 1 & turn (22)
Row 76: SC x 1 then alternate SCPS and SC’s across until you get to the last 3 ST where you will SC2tog in the 2nd and 3rd last ST and then SCPS in the last ST, CH 2 & turn (21)
Row 77: DC in each ST across, CH 2 & turn (21)
Row 78: DC in each ST across except the last 2 stitches where you will DC2tog for a decrease , CH 2 & turn (20)
Row 79: DC in each ST across, CH 1 & turn (20)
Row 80: SC x 1 then alternate SCPS and SC’s across until you get to the last 3 ST where you will SC2tog in the 2nd and 3rd last ST and then SCPS in the last ST, CH 2 & turn (19)
Row 81: DC in each ST across, CH 2 & turn (19)
Row 82: DC in each ST across except the last 2 stitches where you will DC2tog for a decrease, CH 2 & turn (18)
Row 83: DC in each ST across, CH 1 & turn (18)
Row 84: SC x 1 then alternate SCPS and SC’s across until you get to the last 3 ST where you will SC2tog in the 2nd and 3rd last ST and then SCPS in the last ST, CH 2 & turn (17)
Row 85: DC in each ST across, CH 2 & turn (17)
Row 86: DC in each ST across except the last 2 stitches where you will DC2tog for a decrease, CH 2 & turn (16)
Row 87: DC in each ST across, CH 1 & turn (16)
Row 88: SC x 1 then alternate SCPS and SC’s across until you get to the last 3 ST where you will SC2tog in the 2nd and 3rd last ST and then SCPS in the last ST, CH 2 & turn (15)
Row 89: DC in each ST across, CH 2 & turn (15)
Row 90: DC in each ST across except the last 2 stitches where you will DC2tog for a decrease, CH 2 & turn (14)
Row 91: DC in each ST across, CH 1 & turn (14)
Row 92: SC x 1 then alternate SCPS and SC’s across until you get to the last 3 ST where you will SC2tog in the 2nd and 3rd last ST and then SCPS in the last ST, CH 2 & turn (13)
Row 93: DC in each ST across, CH 2 & turn (13)
Row 94: DC in each ST across except the last 2 stitches where you will DC2tog for a decrease, CH 2 & turn (12)
Row 95: DC in each ST across, CH 1 & turn (12)
Row 96: SC x 1 then alternate SCPS and SC’s across until you get to the last 3 ST where you will SC2tog in the 2nd and 3rd last ST and then SCPS in the last ST, CH 2 & turn (11)
Row 97: DC in each ST across, CH 2 & turn (11)
Row 98: DC in each ST across except the last 2 stitches where you will DC2tog for a decrease, CH 2 & turn (10)
Row 99: DC in each ST across, CH 1 & turn (10)
Row 100: SC x 1 then alternate SCPS and SC’s across until you get to the last 3 ST where you will SC2tog in the 2nd and 3rd last ST and then SCPS in the last ST, CH 2 & turn (9)
Row 101: DC in each ST across, CH 2 & turn (9)
Row 102: DC in each ST across except the last 2 stitches where you will DC2tog for a decrease, CH 2 & turn (8)
Row 103: DC in each ST across, CH 1 & turn (8)
Row 104: SC x 1 then alternate SCPS and SC’s across until you get to the last 3 ST where you will SC2tog in the 2nd and 3rd last ST and then SCPS in the last ST, CH 2 & turn (7)
Row 105: DC in each ST across, CH 2 & turn (7)
Row 106: DC in each ST across except the last 2 stitches where you will DC2tog for a decrease, CH 2 & turn (6)
Row 107: DC in each ST across, CH 1 & turn (6)
Row 108: SC x 1 then alternate SCPS and SC’s across until you get to the last 3 ST where you will SC2tog in the 2nd and 3rd last ST and then SCPS in the last ST, CH 2 & turn (5)
Row 109: DC in each ST across, CH 2 & turn (5)
Row 110: DC in each ST across except the last 2 stitches where you will DC2tog for a decrease, CH 2 & turn (4)
Row 111: DC in each ST across, CH 1 & turn (4)
Row 112: SC x 1 then do 1 x SCPS SC2tog in last 2 ST’s, CH 2 & turn (3)
Row 113: DC in each ST across, CH 2 & turn (3)
Row 114: DC in the first ST then in the last 2 stitches you will DC2tog for a decrease , CH 2 & turn (2)
Row 115: DC in each ST across, CH 1 & turn (2)
Row 116: SC together with the SCPS to create just 1 ST (don’t complete the SC in that first stitch, instead keep it open and continue to the 2nd ST to do the SCPS), CH 2 & turn (1) Row 117: DC in each ST across, CH 2 & turn (1)
EDGING for the “VANTAGE” CROCHET TRIANGLE SCARF:
– With your hook still in the one and only ST at the end, SC another ST in that same stitch and begin to work your edging along the straight edge (or top) of the scarf – here you will SC x 100 (approx) to the next corner (including that 2nd SC in the ST at the end) *** If it’s a little less or a little more than 100, don’t be too concerned as long as the edging looks OK. I did 100 not including the corner-rounding additions
– In the last ST on the top of the scarf, add 2 x more SC to turn the corner and SC 195 (approx) to the last ST and then SL ST in to the top of the 1st edging ST, YO and pull through then cut and tie off.
Weave in your ends
TASSELS for the “VANTAGE” CROCHET TRIANGLE SCARF:
* There are lots and lots of online tutorials for creating tassels using yarn and I recommend you watch a few to get the idea, but here is also a written description of how I do my tassels for this poncho
– To create the tassels, find a rigid item about 6” in length (I used a hard cover book)
– Wind the yarn around the item (book) 60 full times and cut so both ends are at the bottom
– Remove the winding from the item and keep it folded in half and cut all the yarn across the bottom
– Cut 1 length of yarn about 3 feet to be used to affix the tassel to the blanket
– Cut 1 length of yarn about 5 feet long to be used to wind around the bulb of the tassel
– Unfold the bundle of yarn and lie it straight on a flat surface – take the first 3’ length of yarn and place it under this bundle in the middle of the bundle, tie tightly in a knot (this will be the piece which affixes to the blanket)
– About 1.25 inches down from the fold at the top of your yarn, tie the second 5’ length of yarn tightly in a knot and begin to wind each side of the knot around the bundle in opposite directions to create the winding under the tassel bulb – wind 14 or so times and tie the ends back together, taking care to cut the ends and tuck the knot in under the winding – you can even forgo cutting the ends and take your tapestry needle and stitch them deep in to the middle of the tassel for a cleaner finish, which is what I do
– Trim the tassel bottom to approx. 2.5” in length from the cinched winding around the bulb so all lengths of yarn in the tassel are the same length – this may take a few careful trimmings
– To affix the tassels to the scarf in the 2 corners and in the middle, use a tapestry needle or a smaller crochet hook to bring one length through each corner – tie in a tight knot and weave in the ends with your tapestry needle or tie in a knot and cut.
Voila! A beautiful crochet triangle scarf to keep you warm & snug in the cold winter months!